


4
CONNECTIONS
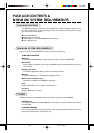
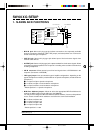
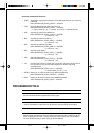
The following diagram shows how to connect the various devices.
CD-ROM
SW20
MIC
LINE IN
OUTPUT
MIC
LINE IN
OUTPUT
CD IN
SW60XG
Sound Card
¢Before making connections, be sure to UNPLUG THE POWER SUPPLY CORDS OF ALL DEVICES.
After making connections, switch on the power of each device in the following order: External inputting devices
first, then the computer, then external audio devices. (NOTE: MAKE SURE TO TURN DOWN THE VOLUME
LEVELS OF THE EXTERNAL AUDIO DEVICES BEFORE TURNING THEM ON.) When turning off the power of
each device, simply reverse the process.
¢Improper connection of microphone and other external devices may cause ear injury or damage to
hardware.
£There are various types of audio in and out jacks, so make sure to select the proper cables and adaptors
according to your respective devices.
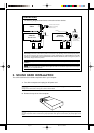
2. SOUND CARD INSTALLATION
The sound card fits into an ISA bus expansion slot in your computer.
1. Turn off the computer and unplug its AC power cord.
¢Do not attempt to install your sound card while the computer is plugged in. This can cause irreparable
damage to the sound card, and may pose a serious shock hazard!
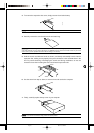
2. Remove the top cover of the computer.
£The proper method for removing the top cover varies depending on the type of computer you use, so please
see your computer’s owner’s manual for the proper procedure. Wear gloves to avoid cuts by any sharp edges on the
cover.
SW60XG
Sound Card
CD-ROM
MIC
LINE IN
OUTPUT
CD IN
Microphone
Microphone
Powered Speakers
Powered Speakers
Portable Cassette Recorder
or Stereo (for inputting
external sounds)
Portable Cassette
Recorder or Stereo
(for inputting
external sounds)
99.12.14, 3:45 PMPage 4