


Replacing the LP Print Head (Continued)
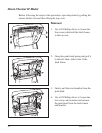
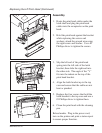
Assembly
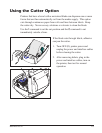
1. Route the print head cables under the
latch shaft and plug the print head
cables into the receptacles on the print
head.
2. Hold the print head against the bracket
while replacing the screws and
washers; attach the ground wire using
the right screw and washer. Use a #1
Phillips driver to tighten the screws.
3. Slip the left end of the print head
spring into the left side of the latch
bracket; then slide the right end into
the other side. The angle of the “V”
fits into the indent on the top of the
print head bracket.
4. Align the latch bracket up to the top
case and ensure that the cable are not
bent or pinched.
5. Replace the four screws that hold the
latch bracket to the top case and use a
#1 Phillips driver to tighten them.
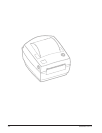
6. Clean the print head with the cleaning
pen.
Reload media. Plug in the power cord,
turn on the printer and print a status report
to ensure proper function.
980483-001A 31