5
MZ-NF810/NF810CK
SECTION 2
GENERAL
This section is extracted from
instruction manual.
14
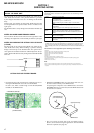
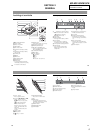
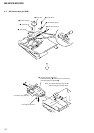
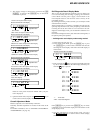
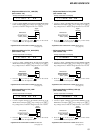
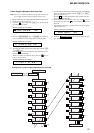
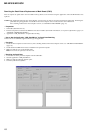
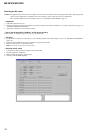
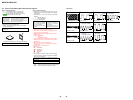
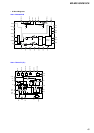
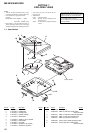
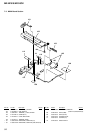
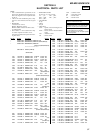
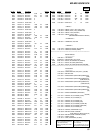
Looking at controls
The recorder
A x • CANCEL/CHG button
B Display window
C Battery compartment
D GROUP button
E REC (record) switch
F Terminals for attaching dry battery
case
G Terminals for attaching the battery
charging stand
H DC IN 3V jack
I X button
J OPEN switch
K END SEARCH button
L T MARK button
M HOLD switch
To prevent the buttons from being
accidentally operated when you carry
the recorder, use this function.
N Handstrap hole
Use the hole to attach your own strap.
O USB cable connecting jack
P LINE IN (OPTICAL) jack
Q MIC (PLUG IN POWER) jack
There is a tactile dot beside the MIC
(PLUG IN POWER) jack.
R i (headphones/earphones)
S MENU button
T 5-way control key
N* • ENTER
. • T
> • t
VOL +
*
, –
* N and VOL + have a tactile dot.
2
4
w;
qg
3
5
6
7
9
qa
qs
qd
qh
qj
qk
ql
qf
q;
8
15
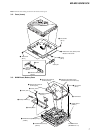
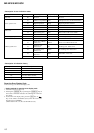
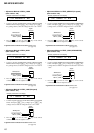
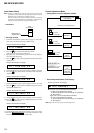
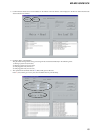
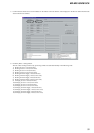
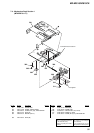
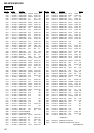
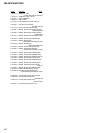
The display window of the recorder
A : Indication for remaining playing
time of the current track or of the disc
: Indication for remaining
recordable time of the disc
B Time display
C Battery indication
Shows approximate battery condition.
D Disc indication
Shows that the disc is rotating for
recording, playing or editing an MD.
E SYNC (synchro-recording) indication
F REC indication
Lights up while recording. When
flashing, the recorder is in record
standby mode.
G LP2 (LP2 stereo), LP4 (LP4 stereo),
MONO (monaural) indication
H Level meter
I Character information display
Displays the disc and track names,
date, error messages, track numbers,
etc.
J Play mode indications
Shows the play mode (shuffle play,
program play, repeat play, etc.) of the
MD.
K Sound indications
21345678
9q;qa
16
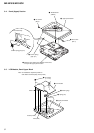
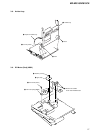
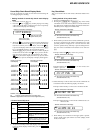
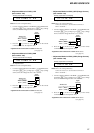
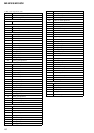
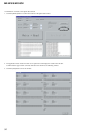
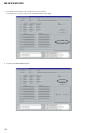
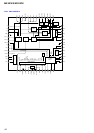
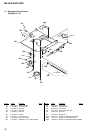
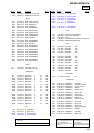
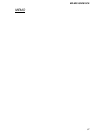
The headphones/earphones with a remote control
A VOL+, – buttons
Press to adjust the volume.
B Jog lever (. • NX/ENT • >,
TUNE – • BAND • TUNE +)
NX/ENT (to press): play, pause,
enter
.(to slide towards): REW
> (to slide towards): FF
BAND (to press): select a band
TUNE – (to slide towards): tune
backwards
TUNE + (to slide towards): tune
forward
C Display window
D x (stop) button
E (group) +, – buttons
F RADIO ON/OFF button
Press to turn on or off the radio.
G Clip
H HOLD switch
To prevent the buttons from being
accidentally operated when you carry
the recorder, use this function.
I DISPLAY button
J P-MODE/ button
K SOUND button
F
G
H
I
J
K
B
C
D
E
A
17
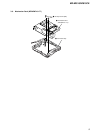
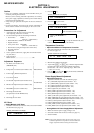
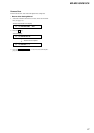
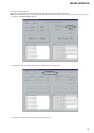
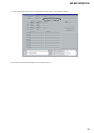
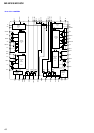
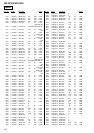
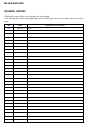
The display window of the remote control
A Disc indication
B PRESET indication
C Character information display
D Play mode indication
E SOUND indication
F Battery level indication
G Track number/Band/Preset number
display
H Group indication
F
HG
BACDE