13
Installation
(continued)
Multilevel Installations
Physical Interface Cascading
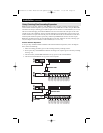
Physical Interface Cascading refers to cascading to a second stage KVM switch (such as the Tripp Lite
B022-016) that doesn’t utilize the same protocol as the first stage B060-032, but uses the same physical
interface (PS/2 or USB ports, for example).
The advantage of cascading to a switch like the B022-016 is that it yields enormous expansion capability.
Since it can be daisy chained to 31 additional B022-016s, up to 16,384 computers can be controlled from a
single B060-032 (32 B060-032 ports x 32 B022-016s x 16 ports per switch = 16,384 ports).
The operational difference between this method and Protocol Interface Cascading is that since the OSD
protocols are not the same, the OSDs of the cascaded B022-016s cannot be integrated. Unlike Protocol
Interface Cascading, the OSD that the operator works with is the OSD for each particular B022-016 - not
an OSD that incorporates all of the switches on the installation.
Therefore, in order to access a computer connected to a particular B022-016, the operator must first bring
up the B060-032’s OSD to access the target B022-016. The B022-016's OSD is then activated in order to
access the target computer.
In this type of installation, the B060-032 is considered the First Stage unit; the B022-016 is considered the
Second Stage unit. If there are additional B022-016s daisy chained down from the Second Stage B022-
016, the entire chain is seen as a Second Stage unit, with the top level B022-016 (the Master switch) as the
OSD access point for the entire chain.
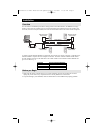
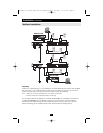
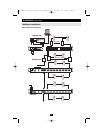
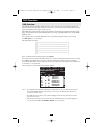
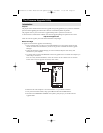
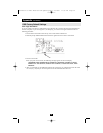
To set up a Physical Interface Cascade, refer to the installation diagram below, and do the following:
1. Make sure that power to all the devices you will be connecting up has been turned off.
2. Use Cat5e cable to connect any available CPU Port on the First Stage unit (the B060-032) to a PS/2
style Server Interface Module (as described in the Cables section, p. 3); plug the Server Interface
Module's KVM connectors to the Keyboard, Video, and Mouse Console ports of the B022-016.
Note: The distance between the Second Stage unit and the B060-032 must not exceed 500ft.
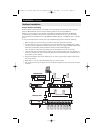
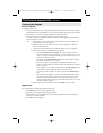
3. Use KVM cable sets for the B022-016 to connect any available CPU port on the Second Stage unit to
the Keyboard, Video, and Mouse ports of the computers you are installing. Note that the B022-016
and the B060-032 use different types of cables.
4. Plug the power cord into the B022-016 switch's Power Socket and into an AC source (such as a surge
suppressor or UPS).
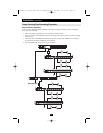
5. Repeat steps 2 - 4 for any other top level Second Stage units you wish to connect.
6. Turn on the power for the First Stage unit; turn on the power for all Second Stage units; turn on the
power to all the computers.
Note: If you are daisy chaining B022-016s, follow the instructions provided in the B022-016 User
Manual for chaining. Power on each chain according to the instructions in the manual.