


24 C
HAPTER
2: I
NSTALLING
THE
S
WITCH
Choosing a Suitable
Site
The Switch is suited for use in an office environment where it can be
wall-mounted, mounted in a standard 19-inch equipment rack, or free
standing. Alternatively, the Switch can be rack-mounted in a wiring closet
or equipment room. A wall-mounting/rack-mounting kit, containing two
mounting brackets and six screws, is supplied with the Switch.
When deciding where to position the Switch, ensure that:
■
You are able to meet the configuration rules detailed in
“Configuration Rules for Fast Ethernet” on page 20.
■
The Switch is accessible and cables can be connected easily.
■
Cabling is away from:
■
Sources of electrical noise such as radios, transmitters and
broadband amplifiers
■
Power lines and fluorescent lighting fixtures
■
Water or moisture cannot enter the case of the Switch.
■
Air-flow is not restricted around the Switch or through the vents in the
side of the Switch. We recommend that you provide a minimum of
25mm (1in.) clearance.
■
No more than four Switch units are placed on top of one another, if
the units are free standing.
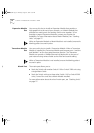
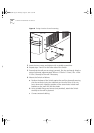
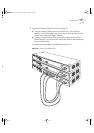
Rack-mounting
The Switch is 1.5U high and fits in most standard 19-inch racks.
CAUTION: Disconnect all cables from the Switch before continuing.
Remove all self adhesive pads from the underside of the Switch if they
have been fitted.
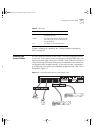
1
Place the Switch the right way up on a hard flat surface, with the front
facing towards you.
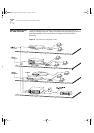
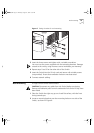
2
Locate a mounting bracket over the mounting holes on one side of the
Switch, as shown in Figure 7.
16950ua.bk Page 24 Thursday, August 27, 1998 11:55 AM