


Rack-mounting 27
Rack Mounting the
Back of your Switch
4500 (PWR only)
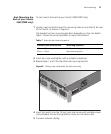
To rack mount the back of your Switch 4500 (PWR only):
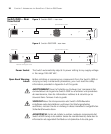
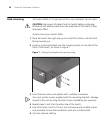
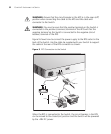
1 Locate a rear rail bracket over the mounting holes on one side of the rear
of the Switch, as shown in Figure 8.
The bracket has two mounting positions depending on the rack depth.
Table 7 shows the correct positions to mount the bracket:
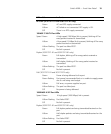
Table 7 Rear rail rack mounting points
2 Insert the screw and tighten with a suitable screwdriver.
3 Repeat steps 1 and 2 for the other rear securing bracket.
Figure 8 Fitting a rear rail bracket for rack-mounting
4 Insert the Switch into the 19-inch rack and secure with suitable screws
(not provided). Ensure that ventilation holes are not obstructed.
5 Connect network cabling.
Distance from Front to Rear Mounting Positions
37cm — 25cm Middle mounting point
43cm — 56cm Rear mounting point