


36 CHAPTER 2: INSTALLING THE WEBCACHE
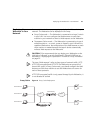
Network Address Translation (NAT) does not apply to the DMZ port of the
Firewall so you will need to configure the Webcache with a registered IP
address.
b Set the Webcache to Proxy Mode. This setting can be made from the
Getting Started Wizard or by selecting Device View > System >
Caching > Set Caching Mode from the Web interface.
c In the Port Number field enter the number
8080 (this is the default
value).
d Do not enable Web Site Blocking on the Webcache as the Firewall has
more advanced filtering abilities and is able to use the 3Com Web Site
Filter (3C16111) if installed.
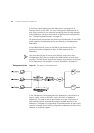
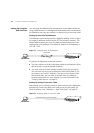
2 Install the Firewall according to the Superstack 3 Firewall User Guide
(DUA1611-0AAA0x) taking into account any safety information.
a On the Web interface of the Firewall click Advanced then Proxy Relay.
b In the Proxy Web Server Address field enter the IP address of your
Webcache.
c In the Proxy Web Server Port field enter the number
8080.
d Click Update to save your changes.
3 No configuration is necessary on the client machines. The Firewall will
intercept any HTTP requests for external URLs and will forward the traffic
to the Webcache.
Setting Up the
Webcache for
Management
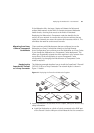
You can quickly set up the Webcache for management in two ways:
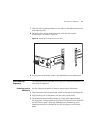
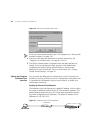
■ Setting Up Using the Web Interface — Connect a management
workstation to the Webcache over an IP test network or directly via a
cross-over cable. For more information, see “Setting Up Using the
Web Interface” on page 38.
or
■ Setting Up Using the Command Line Interface — Connect a
management workstation to the Webcache over an IP test network or
connect a terminal or terminal emulator to the console port of the
Webcache directly, or through a modem. For more information, see
“Setting Up Using the Command Line Interface” on page 40.
CAUTION: You must configure the basic settings of the Webcache by
completing the Getting Started wizard before you introduce the