


Inserting the NIC 1-3
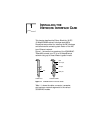
Inserting the NIC
The following instructions apply to installing the 3C900B
NIC in most PCs. If these instructions are not appropriate
for your PC, refer to the documentation that accompanied
your PC.
CAUTION: Each NIC is packed in antistatic packaging to
protect it during shipment. Before handling the NIC, touch
the bare metal case of your PC. While you are handling the
NIC, wear a wrist strap grounded to the PC chassis.
Remove all jewelry from your hands and wrists and use
only insulated or nonconducting tools.
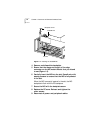
Follow these steps to install the NIC in your PC:
1 Turn the power off, and remove the power cord from
the PC.
2 Unscrew the cover screws and remove the cover.
On some PCs, it may be necessary to remove all cables
before the cover can be removed.
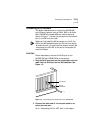
3 Locate an available bus-mastering PCI slot and
remove the screw from the corresponding backplate
(Figure 1-2). Save the screw.
Early PCI PCs that have more than one PCI slot typically have
only one bus-mastering PCI slot. In this case, the correct PCI
slot to use is usually the one closest to the power supply in
the PC. However, you should consult your PC documentation
to verify this. In newer PCI systems, all PCI slots are
bus-mastering slots.
Many PCs have both ISA and PCI slots. Make sure that
you install the NIC only in a bus-mastering PCI slot. See
Figure 1-2. PCI slots are usually white, and they are shorter
than ISA slots.