


12
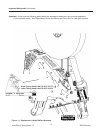
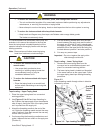
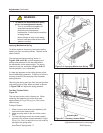
3. Bottom the blade slots against the screws. (This
will position the blade at the correct angle.)
Tighten the blade screws to secure the blade.
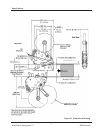
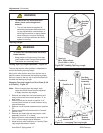
Blade Guard
The blade guard covers the blade whenever a box
is not being taped. Periodically check to be sure the
blade guard is functioning properly and returning to
cover the blade. Replace any defective parts.
Blade Oiler Pad
The taping heads are equipped with a felt oiler pad
that has been pre-lubricated at the factory to
provide a fi lm of oil on the cutting edge of the blade
to reduce adhesive build-up. Apply SAE #30 non-
detergent oil as needed. Saturate felt oiler pad.
Should tape adhesive build-up occur on blade,
carefully wipe clean with an oily cloth.
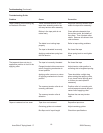
Maintenance
• To reduce the risk associated with shear, pinch, and entanglement hazards:
− Turn air and electrical supplies off on associated equipment before performing any adjustments,
maintenance, or servicing the taping heads
− Never attempt to work on the taping head or load tape while the box drive system is running
• To reduce the risk associated with sharp blade hazards:
− Keep hands and fi ngers away from tape cutoff blades under orange blade guards.
The blades are extremely sharp
WARNING
Note – Check the blade position to insure proper
clearance between blade and guard by slowly
pivoting the blade guard back.
WARNING
• To reduce the risk associated with sharp
blade hazards:
- Keep hands and fi ngers away from tape
cutoff blades under orange blade guards.
The blades are extremely sharp
WARNING
• To reduce the risk associated with sharp
blade hazards:
- Keep hands and fi ngers away from tape
cutoff blades under orange blade guards.
The blades are extremely sharp
Figure 4-1 – Blade Replacement
(Maintenance continued on next page.)
Knife
Guard
Knife
Holder
AccuGlide 3 Taping Head - 2"
2009 February
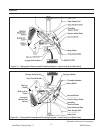
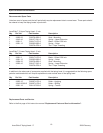
The AccuGlide™ 3 Upper and Lower Taping
Heads - 2 Inch has been designed for long, trouble
free service. The taping head will perform best when
it receives routine maintenance and cleaning. Taping
head components that fail or wear excessively should
be promptly repaired or replaced to prevent damage to
other portions of the head or to the product.
Blade Replacement, Upper and Lower Taping
Heads (Figure 4-1)
1. Loosen, but do not remove, the blade screws (A).
Remove and discard old blade.
2. Mount the new blade (B) with the beveled side
away from the blade holder.