


3M 1997 3M Multimedia Projector MP8620 23
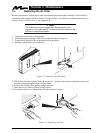
Appendix C: Detailed Setup Information
C-1. Setting Representation, Resolution, Colors
Most computers do not just support one single screen mode but rather a series of different modes which
differ in type of representation (text or full graphic), resolution (number of pixels) and number of colors.
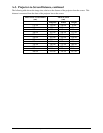
Pre-stored standard mode settings for a variety of IBM compatible and Apple Macintosh computers help
the projector to recognize the current mode and adjust for optimum performance automatically.
Apart from this you can enter and save additional modes with any parameters by means of the menu
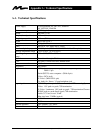
system. An upper limit is given by the maximum admissible pixel rate (Appendix A-1).
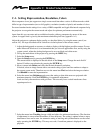
Adjust the projector to optimum display quality, as described below, by using the menu control (see
section 4-4). All steps described can be carried out via the keyboard or the remote control:
1.
Adjust the background as necessary to obtain a display with the highest possible contrast. For use
under Microsoft Windows it is recommended that you close all applications first, and by using the
system control, adjust the desktop background to an even black-and-white raster.
2.
Call up the main menu of the projector by pressing the
MENU
key.
3.
Select the
Setup
menu.
4.
Open the
Setup
menu by pressing the
ENTER
key.
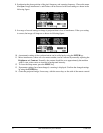
The current mode is displayed in the title block of the
Setup
menu. Change the mode field if
desired. Confirm your selection by pressing the
ENTER
key
5.
Move to menu item
Palette
and select the desired chromatic resolution.
If desired, select an image format with a converted coding of pixel and line numbers to adapt to
the current screen mode. Therefore move to the menu item
Pixel
and select the image resolution.
Use
800x600
for unscaled representation.
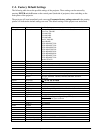
6.
Select the menu item
Brightness
and correct the setting so that white areas are projected with
maximum intensity. Press the
ENTER
key for automatic adjustment.
Look at a finely structured area with grid lines. This area may have vertical interference lines
superimposed on it.
7.
Select the menu item
Tracking
(image width) and adjust for minimum interference. The direction
of adjustment is correct when the number of lines decreases. The setting is optimal when no more
interference lines can be seen. An automatic setting of tracking and synchronization can be called
up by operating the
ENTER
key. This may not work, if a uniform pattern is displayed on the
projector.