


3M 1997 3M Multimedia Projector MP8620 7
Section 4: Operating Instructions
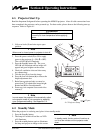
4-1. Projector Start Up
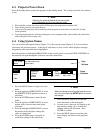
Read the Important Safeguards before operating the MP8620 projector. After all cable connections have
been completed, the projector can be powered up. For best results, please observe the following start up
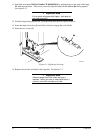
sequence. Refer to Figure 4-1
!
Caution
Allow a projector that has been stored in a cold place
to warm up to room temperature before applying
power.
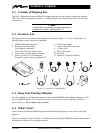
1.
Lift cover locks
(1)
and raise top to open
position.
Note
When cover is closed, power to projector is shut off.
2.
Press the power switch
(2)
to ON to apply
power to the projector.(
|
= ON,
O
= OFF).
The
red
LED
(4)
will illuminate.
3.
Press the Standby button
(3)
. The
green
LED
(4)
will illuminate and an image will
appear and grow brighter on the screen.
4.
Check all ventilation slots and clear away
any obstructions.
5.
Turn the lens
(5)
to focus the image.
6.
Press the foot lock button
(6)
to release the
height adjustment feet.
7.
Raise/lower projector body to extend or
retract feet
(7)
to obtain best image height.
Rotate feet
(8)
for fine adjustment.
8.
Power up your computer source and video
source(s).
Note
In most cases, the projector will automatically adjust
to the graphic mode of your computer by selecting
a pre–programmed setting. See Appendix C-2.
Figure
4-1. Projector Setup
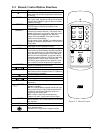
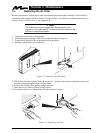
4-2. Standby Mode
When the projector is not being used, place it into standby mode.
1.
Press the Standby button.
2.
The lamp will switch off and the
red
LED
will illuminate.
3.
Press the standby button again to illuminate
the lamp and project an image on the screen.
Note
In standby mode, the fan motor will continue to
run for a few minutes until the projector cools
down.