


13
Chapter 2 - Hardware Installation
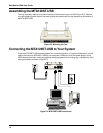
Connecting to Your Computer
1. Plug the 4-pin flat end (Type A) into a USB port connector on your computer or laptop.
Note: Do NOT plug the D-shaped end (Type B) of the USB cable into the USB connector on the back
panel of the MTA128ST-USB at this time. You will be directed to make the connection when installing the
software drivers.
Connecting to Power
1. Plug the power supply into the unit’s POWER connector.
2. Plug the power supply into a live AC outlet.
3. Turn on the unit by sliding the power switch to ON.
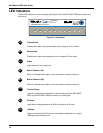
4. Verify operation by observing the LED indicators on the front panel. The LEDs will initially flash in
a self-test pattern, then the LS LED remains on. (See LED descriptions on the next page.) If the
terminal adapter does not appear to be working, see Chapter 5 for troubleshooting help.
Caution: Only use the power supply shipped with your MTA128ST-USB; any other power supply could
damage the unit and void its warranty.
Connecting to Your ISDN Network Terminator
1. If you need a longer line cord than the RJ-45 line cord provided with your MTA128ST-USB, select a
cord that is wired straight through (pin 1 to pin 1; pin 2 to pin 2, etc.) with at least the middle four
pins connected (pins 2, 3, 4, and 5).
2. Plug one end of the provided RJ-45 S/T line cord into the ISDN jack on the MTA128ST-USB and
the other end into the S/T jack on your network terminator.
Note: The AUX jack and ISDN jack are not interchangeable.
Connecting to Analog Equipment
You can connect an analog device such as an analog telephone, modem, or fax machine to the unit.
Simply plug a modular RJ-11 telephone cord into the RJ-11 AUX connector.
Note: The AUX jack and the ISDN jack on the unit are not interchangeable.