


35
Chapter 3 - Software Installation and Configuration
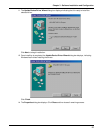
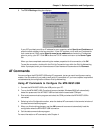
f. The Step 2 of 3: Internet account logon information dialog box is displayed. Enter the user
name and password you will use for your Internet account. Click Next>.
g. The Step 3 of 3: Configuring your computer dialog box is displayed. In the box provided,
enter a descriptive name for this connection and click Next >.
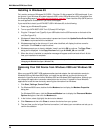
h. You are then asked if you would like to set up an Internet mail account. You may select Yes
or No. If you select yes, you will be asked to provide specific information about your mail
service. In this example, No is selected. Click Next>.
i. The Completing the Internet Connection Wizard is displayed. Click Finish.
If you select Connect to a private network through the Internet:
a. In the box provided, enter the Host name or IP address belonging to the computer to which
you are calling. Contact the network administrator for the device to which you are connecting
to obtain this information. Click Next>.
b. The Connection Availability dialog box is displayed. If you are creating this connection for
multiple users, select Create this connection for all users. If this connection will be used
only by you, select Create this connection only for myself. Click Next> to continue.
c. The Completing the Network Connection Wizard dialog box is displayed. You are prompted
for a name to use for this connection. Enter a meaningful name in the box provided. Click
Finish.
If you select Accept incoming connections:
This option allows another computer to create a virtual connection to your computer through the
Internet, other public network or a direct cable. Virtual Private connections to your computer through
the Internet are possible only if your computer has a known name or IP address on the Internet.
a. The Devices for Incoming Connections dialog box is displayed. Select your Multi-Tech
System modem and click Next>.
b. At the Incoming Virtual Private Connection dialog box, select either Allow virtual private
connection or Do not allow virtual private connection.
c. The Allowed Users dialog box is displayed. Next, you can Add or Delete users you will
allow to connect to this device. Click Next>.
d. In the Networking Components dialog box, select the boxes next to the name of each
component you want to enable for incoming connections. Click Next>.
e. The Completing the Network Connection Wizard dialog box is displayed. In the box
provided, enter a meaningful name for this connection and click Finish.
If you select Connect directly to another computer:
This connection option is designed to allow a connection between two computers using a serial,
parallel or infrared port.
a. The Host or Guest dialog box is displayed. Select the role you’d like for
this
computer.
Select Host if this computer has the information you want to access. Select Guest if this
computer will be used to access information on the Host computer.
b. If you select Host, you will be presented with the Connection Device dialog box. Select the
device from the list. After installing the device through the Wizard, you may configure the
connection properties by right clicking on the icon for this connection and selecting
Properties. Upon completion, click Next>.