


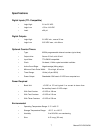

Hardware Installation
1. Make sure to set switches and jumpers from either the Option Selection section of this manual or
from the suggestions of SETUP.EXE.
2. Do not install card into the computer until the software has been fully installed.
3. Turn OFF computer power AND unplug AC power from the system.
4. Remove the computer cover.
5. Carefully install the card in an available 5V or 3.3V PCI expansion slot (you may need to remove
a backplate first).
6. Inspect for proper fit of the card and tighten screws. Make sure that the card mounting bracket is
properly screwed into place and that there is a positive chassis ground.
7. Install an I/O cable onto the card’s bracket mounted connector.
8. Replace the computer cover and turn ON the computer which should auto-detect the card
(depending on the operating system) and automatically finish installing the drivers.
9. Run PCIfind.exe to complete installing the card into the registry (for Windows only) and to
determine the assigned resources.
10. Run one of the provided sample programs that was copied to the newly created card directory
(from the CD) to test and validate your installation.
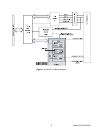
The base address assigned by BIOS or the operating system can change each time new hardware is
installed into or removed from the computer. Please recheck PCIFind or Device Manager if the hardware
configuration is changed. Software you write can automatically determine the base address of the card
using a variety of methods depending on the operating system. In DOS, the PCI\SOURCE directory
shows the BIOS calls used to determine the address and IRQ assigned to installed PCI devices. In
Windows, the Windows sample programs demonstrate querying the registry entries (created by PCIFind
and NTIOPCI.SYS during boot-up) to determine this same information.
Manual PCI-DIO-24DH
11