


34
English ...
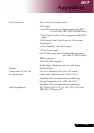
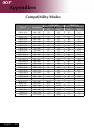
Appendices
4.Followtheabovesteps1-2.Clickonthe“AdvancedProperties”
button.
5. Select the “Change” button under the “Monitor” tab.
6. Click on “Show all devices”. Then select “Standard monitor
types” under the “Manufacturers” box ; choose the resolution
mode you need under the “Models” box.
7.Verifythattheresolutionsettingofthemonitordisplayisless
thanorequalto800x600.
If you are using a Notebook PC:
1.Youarerequiredtoimplementtheabovestepsofresolution
settingofthecomputerrst.
2. Switch the Notebook PC display to the “external display only”
or “CRT only” mode.
Ifyouexperiencedifcultyinchangingresolutionsoryourmoni-
torfreezes,restartalltheequipmentandtheprojector.
Problem: The screen of the Notebook or PowerBook com-
puter is not displaying your presentation.
If you are using a Notebook PC:
Some Notebook PCs may deactivate their screens when a second
display device is in use. Refer to your computer’s documentation
for information on how to reactivate the monitor display.
If you are using an Apple PowerBook:
InControlPanels,openthePowerBookDisplaytoselectVideo
Mirroring “On”.
Problem: Image is unstable or ickering
Use “Tracking” to correct it. Refer to page 23.
Change the monitor color setting from your computer.
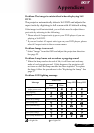
Problem: Image has vertical ickering bar
Use “Frequency” to make an ad adjustment. Refer to page 23.
Checkandrecongurethedisplaymodeofyourgraphiccardto
make it compatible with the product. Refer to page 25.
Problem: Image is out of focus
AdjuststheFocusRingontheprojectorlens.Refertopage14.
Make sure the projection screen is between the required distance
4.9to39.4feet(1.5to12.0meters)fromtheprojector.