


SmartView Installation and Use Page 13
2.4 Configuring your PCs
Configure your PC in the same way that you would if your keyboard, mouse and
monitor were all connected directly to your PC, but bearing in mind the following
points:
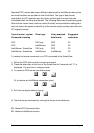
SmartView emulates Microsoft compatible serial, IntelliMouse and PS/2 mice, so
ensure that your PC software is configured for a Microsoft mouse of the correct type.
Refer to the list of supported drivers in section 2.1.
SmartView supports VGA/SVGA/XGA/XGA2 type monitors, but does not support
the automatic detection features available with some ‘plug and play’ monitors and
video cards. If you have this type of video card and monitor, you should select the
video mode manually instead of relying upon the automatic detection feature.
2.5 Configuring the SmartView
The SmartView is supplied pre-configured with factory defaults which are suitable for
most applications. There are a number of more advanced options which can be set
by the user. These are stored in the SmartView's EEPROM memory and are
retained when the power is disconnected.
The options may be changed whilst the SmartView is in configure mode. You may
enter configure mode at initial power on or whilst the SmartView is running:
To enter configure mode at power on:
Switch off all the attached PCs and the SmartView. Hold down the SELECT key
whilst powering on the SmartView. Do not release the key until the SmartView
displays 'C' to show that it has entered configure mode.
To enter configure mode whilst the SmartView is running:
Hold down the SELECT key for 5 seconds until the front panel display shows ‘C’.
In configure mode, options are entered by typing a letter followed by a number
followed by (enter). Use ESC to abort the entry of an option. The SmartView will
remain in configure mode until you type 'E' (enter).