


SmartView Installation and Use Page 16
3. Using the SmartView
This section explains the general operation of the SmartView. We recommend that
you read this section before starting to use the product.
3.1 Power on status
At power on the SmartView selects PC number 1 and displays '1'. If a password has
been set then ‘P’ will be displayed and the SmartView will remain locked until a valid
password is entered.
3.2 Front panel key and remote controller
The front panel key is used to select which channel is currently connected to the
shared keyboard, mouse and monitor. It is also used to enter configuration mode
(see section 2.5). Pressing the key during normal operation will cause the next
channel to be selected. For the 2 port SmartView this cycles around ports 1 and 2.
For the 4 port SmartView this cycles around ports 1, 2, 3 and 4.
An optional remote controller is also available which replicates the front panel button
and display, but can be located remotely from the SmartView. This is particularly
useful in applications where the SmartView is located away from the desktop. The
remote controller can be conveniently attached to your keyboard with a couple of
Velcro strips to give instant channel information and key control.
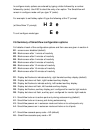
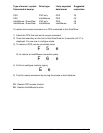
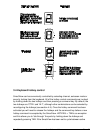
3.3 Status display
The status display usually shows the currently selected port. If autoscan mode is
selected, the segments will illuminate in sequence in a clockwise direction
interspersed with a display of the currently selected channel. If SmartView has been
locked, ‘P’ will be displayed until a valid password has been typed to unlock the unit.
Data flow from the mouse or keyboard causes the dot to flash.