


Configuring Communication
52
MAX-CSE/MAX-CSD10 Operation/Reference Guide
Configuring the MAX Communication Parameters
Although the unit is initially configured to obtain the first available DHCP Address, it is recommended
that after the initial connection, the unit be setup to use a Static IP Address. Using a Static IP Address for
both the source and destination devices can be beneficial for both diagnostic and direct access purposes.
Obtaining the Unit’s Initial DHCP Address
1.
Connect an Ethernet cable to the unit’s rear Ethernet connector.
2. Connect the 2-pin 3.5mm mini-Phoenix PWR connector to the rear power connector and then apply
power.
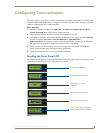
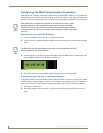
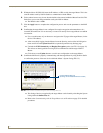
3. After the unit has successfully obtained an IP Address from the DHCP Server, it then displays this
obtained DHCP Address across the front LCD (FIG. 32).
4. Write down the newly obtained DHCP Address displayed on the front panel LCD.
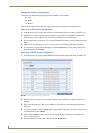
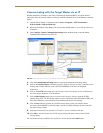
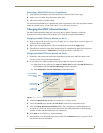
Communicating with the Unit via the Browser-Based UI
To facilitate communication with the MAX-CSE and MAX-CSD10, it is necessary for the unit to obtain
a DHCP Address. Once that address is known, you can then use your web browser to access the browser-
based User Interface (UI) pages and then configure the project, video, and IP connection parameters.
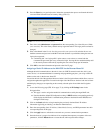
1. Launch your web browser.
2. Enter the IP Address of the target unit (ex: http://192.199.99.99) into the web browser’s Address
field.
MAX Products are not designed or intended to, and may not be used to, violate
anyone’s copyright or other intellectual property rights. Each user of the MAX
Products may only use the products in connection with materials legally owned or
licensed by such user and only to the extent such ownership or license rights permit
such use.
The MAX-CSE uses the active Ethernet connection to communicate with the DHCP
Server and obtain a valid DHCP Address.
FIG. 32 Example of the current IP Address