


Storix System Backup Administrator - 5 - Enabling Backups for Windows and MAC OS X
Sharing SMB Folders
As already discussed, this is not a function of SBAdmin, but one what must be setup on your SMB
(Windows/MAC) system. Beginning with Chapter 2, we provide as much detail as possible for configuring
shared folders on each of the different systems and versions.
Configuring SMB Client Backups
The Storix SBAdmin GUI interface provides the ability to configure an SMB client, configure SMB backup jobs,
as well as view backup output data, performance statistics, verify and, of course, restore SMB data.
SBAdmin may only backup an entire SMB share (at this time), not specific files within. However, you can
configure exclude lists which may be used with SMB backups to limit the data backed up within the share.
Detailed instructions are provided for configuring SMB clients in the Storix System Backup Administrator
User Guide. In summary, after installing your Network Administrator software, the steps to begin your first
backup will be:
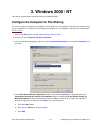
1. Enable the Windows (SMB) Backup Feature: To do this, select Configure!Software License, select the
Windows (SMB) Backup Feature, then either:
a. Enter the license key provided by Storix, which will enable SMB client support for a certain number of
clients, or
b. Select the 30-day trial button to configure the system for a 3-day trial and unlimited number of SMB
clients.
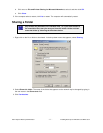
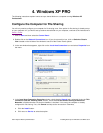
2. Configure an SMB Client: After selecting Configure!Windows (SMB) Clients, you will provide the
username and the password to access this account, and must assign the client an SMB host. The SMB
host is a Linux system from which the shared data will be accessed. It is often desirable to have the same
system where the backup data will be stored also be the SMB host, as this will reduce the amount of
network traffic during the backup.
3. Configure an Exclude List: This optional feature can be found using Configure!Exclude Lists, and may
be used to select files or directories that should be excluded from the backup. You can use wildcards (*)
within the file or directory specifications to easily exclude files with similar names.
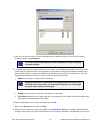
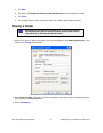
4. Configure a Backup Job: Using Configure!Backup Jobs, you will create a new job name, then select the
SMB_SHARES backup profile, which will define the backup job as one for backing up SMB share data. You
can create any number of backup profiles for SMB shares, each with different default options, however for
simplicity, this one is provided for you by default.
When configuring the backup job, you will also select the backup server, and the device or directory where
the data will be stored. You can also select to use an exclude list provided in step 3, to encrypt the backup
data (if the optional Backup Data Encryption Feature is also installed), and to schedule the backup to run
at a specific time.
5. Run a Backup Job: To run the backup, just select Actions!Run a Backup Job or select the Run Job
button when configuring the backup job. The backup will be performed and the backup output and status
messages will be saved on the administrator. You will be able to view this information, the backup label,
history and performance reports, just as with any other SBAdmin client.