


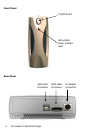


The Leader in Personal Storage10
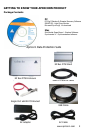
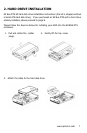
Installing the Single Port eSATA PCI Bracket
Installing the Single Port eSATA PCI Bracket applies only for Desktop computers.
The desktop computer must be equipped with a SATA compatible motherboard, an
open SATA port and open PCI bracket insert on the case.
Please consult the manufacturers documentation for compatibility and instructions
on how to open the case and nd the appropriate port. Anytime you make a
connection to a port directly on the motherboard extreme caution should be
observed including but not limited to turning the power off to the computer,
dissipating power and electrostatic charges. See the FAQ’s for basic Electrostatic
Discharge instructions.
1. Turn off the power to your desktop computer.
2. Disconnect the power cable and then hit the power button on your desktop
computer to discharge any power stored on the motherboard.
3. Discharge any electrostatic charge that is built up by touching a bare metal
portion of the computer case.
Refer to the FAQs for basic ESD information or the manufacturer’s documentation
for more in-depth information about proper Electrostatic Discharge precautions
when working with your motherboard.
4. Open the case and locate the open SATA port on the motherboard.
5. Connect the SATA end of the of the Single Port eSATA PCI Bracket to the
open SATA port on the motherboard.
6. Remove one of the case expansion slot brackets / inserts (cover or back
plates) from the back of computer case and insert the Single Port eSATA PCI
Bracket into that slot and secure with the same screw that was holding the
PCI bracket insert.
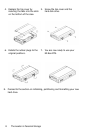
7. Close the computer case and go back to the beginning of Section 3
CONNECTING YOUR EZ BUS DTS (for a system with a pre-installed eSATA
card) and follow the instructions.