15
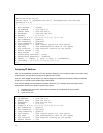
E. Http server = [on]
F. Telnet/Http username = [root]
G. Telnet/Http password = [enabled]
H. reboot I. logout J. ping K. help L. loaddefault
M. securedip = [0.0.0.0],[0.0.0.0],[0.0.0.0]
>>>>
Press
H
to reboot the switch after making your change. Press
Enter
twice, and the new IP address will now
be displayed.
By the similar methods, you can configure the Subnet Mask (Default subnet mask is 255.255.255.0),
Broadcast (Default Broadcast is 255.255.255.255), and Default Gateway (Default Gateway is 0.0.0.0). The
gateway address is the router that can forward packets to the other IP networks.
Note:
After you finish configuring the above settings, you must execute
H
(reboot)
command to take effect.
Afterwards, you can use the
J (Ping)
command to check whether the network setting has finished or not.
Secured IP
Secured IP can guard against unauthorized users gaining access to your network configurations. You can
allow up to three IP addresses to have access to the switch via telnet or a web browser.
The default Secured IP is 0.0.0.0 for all three entries, which means that no network security on IP was set
from original factory setting.
Type in “
M 1 xxx.xxx.xxx.xxx
” after the symbol >>>> and press
Enter
twice in order to set the first secured
IP (where the x’s stand for the desired IP address from your network). Then only the end station with IP
address that you set has access to the network management and configuration.
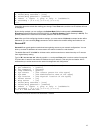
6. traps=[0.0.0.0] [0.0.0.0] [0.0.0.0] [0.0.0.0]
7. get-community = [public]
8. set-community = [private]
9. trap-community = [public]
A. sys-contact = [The contact person for this agent]
B. sys-name = [The administrative name of the agent]
C. sys-location = [The Physical location of the agent]
D. Telnet server = [on]
E. Http server = [on]
F. Telnet/Http username = [root]
G. Telnet/Http password = [enabled]
H. reboot I. logout J. ping K. help L. loaddefault
M. securedip = [0.0.0.0],[0.0.0.0],[0.0.0.0]
>>>> M 1 xxx.xxx.xxx.xxx
Repeat the process for the other two addresses, if desired.


