


1-16
Chapter 1: Product introduction
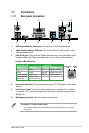
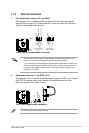
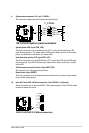
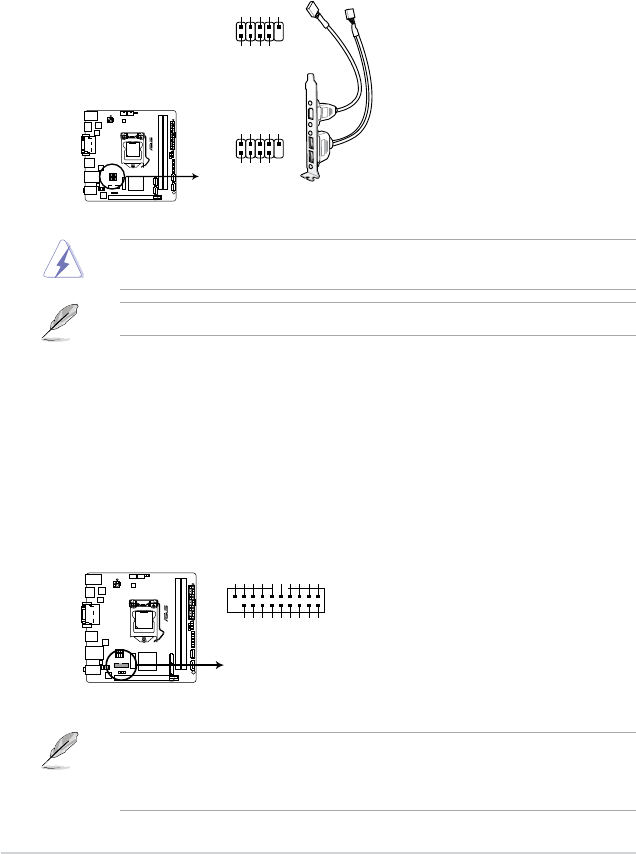
7. USB 2.0 connectors (10-1 pin USB910, USB1112)
These connectors are for USB 2.0 ports. Connect the USB module cable to any of
these connectors, then install the module to a slot opening at the back of the system
chassis. These USB connectors comply with USB 2.0 specications and supports up to
480Mbps connection speed.
Never connect a 1394 cable to the USB connectors. Doing so will damage the
motherboard!
The USB 2.0 module is purchased separately.
H81I-PLUS
USB910
PIN 1
USB+5V
USB_P10-
USB_P10+
GND
NC
USB+5V
USB_P9-
USB_P9+
GND
USB1112
PIN 1
USB+5V
USB_P12-
USB_P12+
GND
NC
USB+5V
USB_P11-
USB_P11+
GND
H81I-PLUS USB2.0 connectors
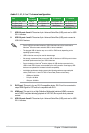
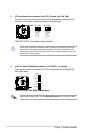
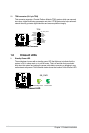
8. USB 3.0 connector (20-1 pin USB3_12)
This connector allows you to connect a USB 3.0 module for additional USB 3.0 front
or rear panel ports. With an installed USB 3.0 module, you can enjoy all the benets of
USB 3.0 including faster data transfer speeds of up to 5Gbps, faster charging time for
USB-chargeable devices, optimized power efciency, and backward compatibility with
USB 2.0.
• The USB 3.0 module is purchased separately.
• This connector is based on xHCI specications. We recommend you install the related
driver to fully use the USB 3.0 ports in Windows
®
7.
H81I-PLUS
H81I-PLUS USB3.0 Front panel connector
USB3_12
+5V
USB3_RX_DN3
USB3_RX_DP3
GND
USB3_TX_DN3
USB3_TX_DP3
GND
S_USB_PN2_R
S_USB_PP2_R
GND
PIN 1
+5V
USB3_RX_DN2
USB3_RX_DP2
GND
S_U3TXDN4
S_U3TXDP4
GND
S_U3RXDP4
S_U3RXDN4