


5-38 Chapter 5: Software support
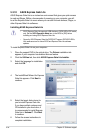
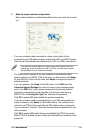
Setting the BIOS RAID items
After installing the hard disk drives, make sure to set the necessary RAID items in
the BIOS before setting your RAID conguration.
To set the BIOS RAID items:
1. Boot the system and press <Del> during the Power-On Self-Test (POST) to
enter the BIOS Setup Utility.
2. Set the SATA Operation Mode item to [RAID]. See section 4.4.6 Onboard
Device Conguration > MCP Storage Cong for details.
3. Save your changes and Exit Setup.
5.4.2 NVIDIA
®
RAID congurations
The motherboard includes a high performance SATA RAID controller integrated
in the NVIDIA
®
nForce™ 750a SLI chipset. It supports RAID 0, RAID 1, RAID 0+1
and RAID 5 for six independent Serial ATA channels.
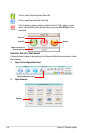
Installing Serial ATA (SATA) hard disks
The motherboard supports Ultra DMA 133/100/66 and Serial ATA hard disk drives.
For optimal performance, install identical drives of the same model and capacity
when creating a disk array.
To install the SATA hard disks for a RAID conguration:
1. Install the SATA hard disks into the drive bays.
2. Connect the SATA signal cables.
3. Connect a SATA power cable to the power connector on each drive.
Refer to the RAID controllers user manual in the motherboard support DVD for
detailed information on RAID congurations. See section 5.2.5 Manuals menu.
• For detailed descriptions on the NVIDIA
®
RAID conguration, refer to the
“NVIDIA
®
RAID User Guide” found in your motherboard support DVD.
• When using Windows
®
XP operating system, make sure to install the
Windows
®
XP Service Pack 2 or later versions.
• Due to chipset limitation, when set any of SATA ports to RAID mode, all
SATA ports run at RAID mode together.
• Make sure to re-enter your NVRAID settings after the CMOS is cleared;
otherwise, the system will not recognize your RAID setup.