


ASUS P4GE-VM motherboard user guide
1-13
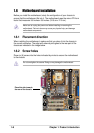
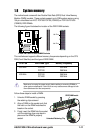
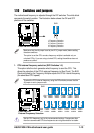
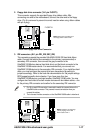
1.10 Switches and jumpers
The motherboard frequency is adjusted through the DIP switches. The white block
represents the switch position. The illustration below shows the ON and OFF
positions of the switches.
®
P4GE-VM
P4GE-VM DIP Switches
1.Frequency Selection
2.Frequency Selection
3.Frequency Selection
4.Frequency Selection
5.Frequency Selection
SW1
ON
12345
ON
OFF
®
P4GE-VM
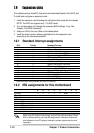
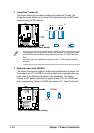
P4GE-VM CPU
External Frequency Selection
SW1
CPU
AGP
PCI
CPU
AGP
PCI
135MHz
ON
12345
67MHz
33MHz
125MHz
ON
12345
62MHz
31MHz
114MHz
ON
12345
76MHz
38MHz
111MHz
ON
12345
74MHz
37MHz
120MHz
ON
12345
60MHz
30MHz
133MHz
ON
12345
66MHz
33MHz
109MHz
ON
12345
72MHz
36MHz
107MHz
ON
12345
71MHz
35MHz
103MHz
ON
12345
68MHz
34MHz
100MHz
ON
12345
66MHz
33MHz
105MHz
ON
12345
70MHz
35MHz
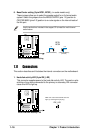
Make sure that the J6 jumper is set to pins 2-3 ( jumper mode) before setting
the above switches.
The option to set the CPU core:bus frequency multiple is available only on
unlocked CPUs. If you are using a locked CPU, setting the switches does not
produce any effect.
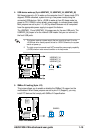
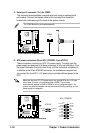
1. CPU external frequency selection (SW1 Switches 1-5)
This option tells the clock generator what frequency to send the CPU. This
allows the selection of the CPU’s external frequency (or Bus Clock). The BUS
Clock multiplied by the Frequency Multiple equals the CPU’s internal frequency
(the advertised CPU speed).
To select the CPU external frequency using the DIP switches, ensure that the
J6 jumper is set to jumper mode.
Set the CPU frequency only to the recommended settings. Frequencies other
than the recommended CPU bus frequencies are not guaranteed to be stable.