


16
E
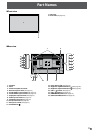
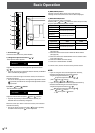
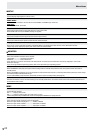
Basic Operation
1
2
3
4
5
6
7
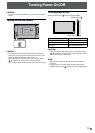
1. Power button ( )
Press this button to turn the power ON/OFF.
2,3. Brightness adjustment button ( / )
The brightness menu appears.
BRI GHT 15
Adjust the brightness with the brightness adjustment button
( / ).
* If you do not press any buttons for about 4 seconds, the BRIGHT
menu automatically disappears.
Move the cursor left or right in the menu screen, and increase or
decrease the setting.
* The cursor moves right when the brightness adjustment button
( ) is pressed, and left when the brightness adjustment button
( ) is pressed.
4,5. [VOL+/ ]/[VOL-/ ] button
The volume menu appears.
VOL UME 15
Adjust the volume with the [VOL+/ ]/[VOL-/ ] buttons.
* If you do not press any buttons for about 4 seconds, the
VOLUME menu automatically disappears.
Move the cursor up or down in the menu screen, and increase or
decrease the setting.
* The cursor moves up when the [VOL+/
] button is pressed,
and down when the [VOL-/ ] button is pressed.
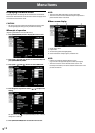
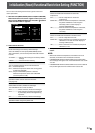
6. [MENU/ENTER] button
Displays and turns o the menu screen. (See page 18.)
Settings can be entered when the menu screen is displayed.
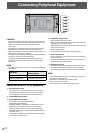
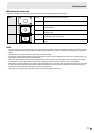
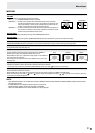
7. [INPUT/RETURN] button
The input selection menu is displayed.
Press the [VOL+/ ]/[VOL-/ ] buttons to select the input mode,
and press [INPUT/RETURN] button to enter.
Input mode Video Audio
DisplayPort DisplayPort input terminal
*3
HDMI1 [PC]
PC/AV HDMI input terminal
*1
HDMI1 [AV]
HDMI2 [PC]
PC/AV HDMI input terminal
*2
HDMI2 [AV]
When HDMI DUAL is set to ON
Input mode Video Audio
DisplayPort DisplayPort input terminal
*3
HDMI DUAL [PC]
*4
PC/AV HDMI input terminal
*4
*5
HDMI DUAL [AV]
*4
*1 Select the terminal to be used in HDMI1 of INPUT SELECT.
(See page 20.)
*2 Select the terminal to be used in HDMI2 of INPUT SELECT.
(See page 20.)
*3 Select the terminal for AUDIO SELECT which is used for audio
input. (See page 20.)
*4 Same as the HDMI1 terminal setting.
*5 Same as the AUDIO SELECT of HDMI1.
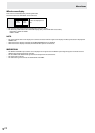
In a menu screen, returns the cursor to the previous screen.
• If you are using the vertical sticker (Operation buttons),
substitute the following for the button displays.
- Brightness adjustment button (
/ )
Brightness adjustment button ( / )
- [VOL+/
]/[VOL-/ ] button
[VOL+/ ]/[VOL-/ ] button
• If you are using the horizontal sticker (Operation buttons),
substitute the following for the button displays.
- Brightness adjustment button (
/ )
Brightness adjustment button ( / )
- [VOL+/
]/[VOL-/ ] button
[ /VOL+]/[VOL-/ ] button
NOTE: