


3. Installation Guidelines
3.8 Battery Installation in the RCU
How is the battery delivered ?
A battery (not yet installed to save the battery life time) is delivered inside the plastic bag with the power cord.
How to install ?
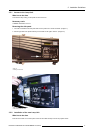
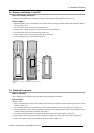
1. Remove the battery cover on the backside of the remote control by pushing the indicated handle a little towards the bottom of
the RCU. (image 3-19)
2. Lift up the top side of the cover at the same time.image 3-19
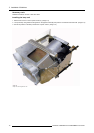
3. Insert the new 9 V battery (type E-block or equivalent) in the lower compartment.
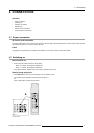
4. Connect the battery (B) to the contact plate (A). (image 3-20)
5. Insert the battery into the lower compartment and put the cover back.
6. Insert a overview card (C) in the back side.image 3-20
Image 3-19
Opening the battery cover of
the RCU
A
B
C
Image 3-20
Mounting the battery into the RCU
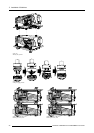
3.9 Stacking Projectors
What is possible?
Up to 3 projectors can be stacked on each other without using extra tools or accessories.
How to stack?
Handle as follow:
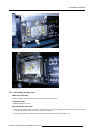
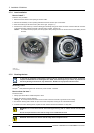
1. Put the second projector on the first one so that base plate of the second projector matches with the rigging socket of the first
projector. (image 3-21)
2. Turn the rigging sockets of the second projector counter clockwise until they are free to move up and down. (image 3-22)
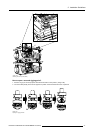
3. Se
cure the projectors on each other by bringing the free part of the second projector into the socket of the first projector and turn
a quarter clockwise while pushing downwards until it clicks in.
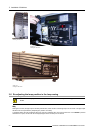
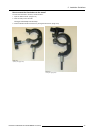
4. For ceiling mounted configurations, pull on the hook (A) with the cable of the lowest projector. (image 3-23)
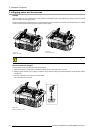
5. Guide hook and cable around the carry handle and guide it around the carry handle of the upper projector. (image 3-24)
6. Hook it in the foreseen hole B in the base plate of the upper projector. (image 3-25)
R5976562 BARCOSLM G10 PERFORMER 20/10/2004
25