


ENGLISH
V-AMP 3 User Manual
7
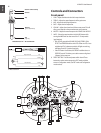
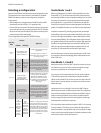
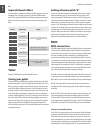
Selecting a configuration
Press the B and D buttons simultaneously to enter configuration mode.
The display shows the current selection. Use the BANK UP and BANK
DOWN arrow buttons to select a new configuration. See table for
routing options.
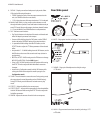
When headphones are plugged into the PHONES jack, the V-AMP 3 •
automatically switches to Studio 1 (S1) operating mode.
Press the TAP key and turn the GAIN knob to adjust the input sensitiv-•
ity to match the output of your guitar’s pickups. If the CLIP LED lights,
the input sensitivity must be reduced. Only raise the sensitivity if the
pickups have particularly weak output.
To exit configuration mode, press the TUNER/EXIT button.
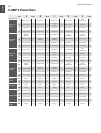
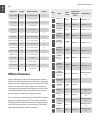
Operating
Mode
Function
Application
LINE OUT L LINE OUT R
Studio 1
(S1)
Stereo operation with
selected effects and
speaker simulations.
V-AMP 3 as practice amp, e.g. with •
headphones.
Recording situation: (V-AMP 3 is •
connected to stereo line channel on
the mixing console).
Studio 2
(S2)
Left (dry
signal, only
compressor
plus
auto-wah).
Right (with
modulation,
delay and
reverb
effects).
Recording situation: with the left •
channel connected to the recording
device. The right channel is used
for monitoring only (with effect).
Advantage: while recording, you don't
have to specify the effect used during
the mix-down, but can still monitor
wet signals.
Live 1 (L1)
Stereo operation +
additional 3-band
EQ (adjustable in
CONFIGURATION mode).
V-AMP 3 connected to a guitar amp •
with stereo input. The additional
EQ (BASS, MID & TREBLE controls)
allows you to match the sound to
the amplifier used. The additional EQ
does not affect the settings of
your presets.
Live 2 (L2)
Stereo operation +
additional 3-band EQ,
but without cabinet
simulation.
Here, too, the V-AMP 3 can be •
connected to a guitar amp with a
stereo input. The additional EQ (BASS,
MID & TREBLE controls) allows you
to match the sound to the amplifier
used. However, since no cabinet
simulation is enabled, the speaker
sound is determined by the combo/
cabinet used.
Live 3 (L3)
Left
+ additional
3-band
EQ with
modulation,
delay and
reverb
effects, but
without
cabinet
simulation
Right
with
cabinet and
modulation,
delay and
reverb
effects, but
without
additional
3-band EQ.
V-AMP 3 as a stage amp, with the left •
output connected to a line input on
the monitor amp. The additional EQ
(BASS, MID & TREBLE controls) allows
you to match the sound optimally to
the monitor amp. The right channel
(DI Out) is connected to the mixing
console or stage box and is used for
the FOH mix.
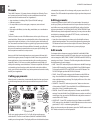
Studio Mode 1 and 2
When using headphones, the V-AMP 3 will automatically switch into
Studio Mode 1 (S1). This stereo mode works well for both monitoring
and recording with effects, amp and speaker modeling. If you are certain
the tone you have selected is what you want permanently recorded,
then Studio Mode 1 is a good option. This Mode does not apply the
3-band EQ to the signal, but most recording programs have advanced
graphic EQ capabilities that allow you much more precise adjustments.
In addition to advanced EQ, recording programs often possess high
quality effects plug-ins that can be tweaked and edited to your heart’s
content. In this regard, Studio Mode 2 may be a better option to allow
the most editing flexibility. This configuration sends a signal with amp
and speaker simulation in both channels, but only the right output has
the effects, leaving the left output “dry” and ready for editing in your
DAW. You may either record both outputs to separate tracks, or only
record the “dry” left output while monitoring the right output.
Visit www.behringer.com for tips about integrating your V-AMP 3 with
your computer system and exchanging presets and experiences with
other V-AMP users.
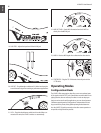
Live Mode 1, 2 and 3
When performing live with the V-AMP 3, the most common way to get
the sound to the crowd is to run the unit into an amplifier on stage,
route your signal directly into a mixing board, or both.
If you chose to run the outputs directly to the main mixer, Live Mode
1 will be the best option as it includes amp and speaker simulation,
effects, and the 3-band EQ. You will have no sound on stage unless the
signal is sent to a monitor speaker, so make sure the venue can accom-
modate this setup.
Another option is to use Live Mode 2 and run the V-AMP 3 into the
effects loop return inputs of 2 different guitar amps. This configuration
does not feature speaker simulation and allows the amplifier’s natural
speaker sound to go unaltered. In this scenario, the amps would be
mic’ed on stage to get the sound to the house speakers, and having a
dedicated monitor would be less important.
The most practical and versatile way to use the V-AMP 3 in a live setting
is using Live Mode 3. This allows you to send the left output (without
speaker simulation) to an amp’s effects loop return to provide on-stage
volume, and also send the right output (with speaker simulation) to the
main mixer for inclusion in the main house mix.