(No.PA019)1-15
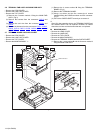
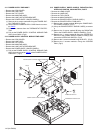
3.9 LAMP UNIT UPPER BRACKET
• Remove the LENS COVER.
• Remove the LAMP UNIT.
• Remove the TOP COVER.
• Remove the MAIN PWB ASS'Y.
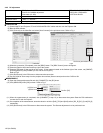
(1) Remove the 2 screws marked M fixing the LAMP UNIT UP-
PER BRACKET. (Fig.4)
(2) Pull out the LAMP UNIT UPPER BRACKET in the direction
of the arrow.
3.10 POWER SUPPLY SHIELD CASE(1) and LAMP BALLAST UNIT
• Remove the LENS COVER.
• Remove the LAMP UNIT.
• Remove the TOP COVER.
• Remove the MAIN PWB ASS'Y.
• Remove the LAMP UNIT UPPER BRACKET.
(1) Remove the 5 screws marked N fixing the POWER SUP-
PLY SHIELD CASE(1). (Fig.4)
(2) Disconnect the connectors CN1
and CN2.
(3) Remove the 1 screw marked O fixing the LAMP POWER
SUPPLY CORD SUPPRESSION BRACKET. (Fig.4)
(4) Lift up the LAMP POWER SUPPLY CORD SUPPRES-
SION BRACKET to remove it, and remove the LAMP
POWER SUPPLY CORD.
(5) After setting up the POWER SUPPLY SHIELD CASE(1),
remove the 4 claws marked a which secure the LAMP BAL-
LAST UNIT to the back of the POWER SUPPLY SHIELD
CASE. (Fig.4)
Fig.4
LAMP UNIT UPPER BRACKET
M
(x2)
CN2
O
(x1)
N
(x5)
a
CN1
LAMP POWER SUPPLY CORD
SUPPRESSION BRACKET
LAMP POWER SUPPLY CORD
POWER SUPPLY SHIELD CASE(1)
LAMP BALLAST UNIT


