


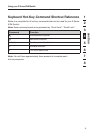

1
2
3
4
5
6
7
8
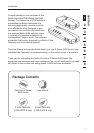
section
7
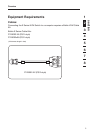
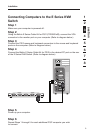
Installation
Pre-Conguration
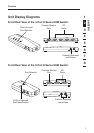
Where to Place the KVM Switch
The OmniView E Series KVM Switch is designed to sit on top of your desktop.
Where you place the KVM Switch will be based on the location of your CPUs and
the length of your cables.
Consider the following when deciding where to place the KVM
Switch:
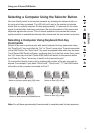
•whetherornotyouintendtousethedirect-accessportselectors
•thelengthsofthecablesattachedtoyourkeyboard,monitor,andmouse
•thelocationofyourcomputersinrelationtoyourconsole
•thelengthsofthecablesyouusetoconnectyourcomputerstotheKVMSwitch
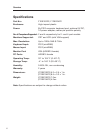
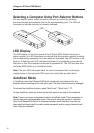
Cable-Distance Requirements:
For PS/2 Computers:
VGA signals transmit best up to 25 feet (7.6m). Beyond that length, the
probability of video degradation increases. For this reason, Belkin recommends
that the length of the cables between the KVM Switch and the connected
computers does not exceed 25 feet (7.6m).
Note: The Belkin OmniView CAT5 Extender (F1D084) may be used to extend your
console (keyboard, mouse, and monitor) by up to 300 feet (91m).
Cautions and Warnings!
Avoid placing cables near fluorescent lights, air-conditioning equipment, or
machines that create electrical noise (e.g., vacuum cleaners).
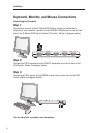
Installation Guide
You are now ready to begin installation of your KVM Switch. The following
sections (pages 8–10) provide complete instructions for the hardware setup.
Before attempting to connect anything to the E Series KVM Switch or your
computers, ensure that everything is powered off. Plugging and unplugging cables
while computers are powered on may cause irreversible damage of the computers
and/or the KVM Switch. Belkin is not responsible for damage caused in this way.