


INSTALLATION
24
3.5 Local Unit Installation
To install a Local Unit:
1. Switch off the PC and any peripheral devices before connection.
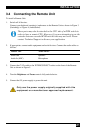
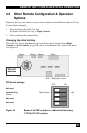
2. Using the supplied CPU KVM cable(s), connect the keyboard, monitor(s) and mouse
connectors on the computer (or KVM switch) to the corresponding connectors on the
Local Unit as shown in Figure 6.
Ensure that you attach the keyboard and mouse connectors to the correct ports. The
keyboard connector is purple; the mouse connector is green.
If your PC does not have a PS/2 mouse port, an active serial converter
will be required - Model No: AC244A.
3. If you have a dual access system, connect the keyboard, mouse and monitor for the local
console to the appropriate ports on the Local Unit. The ports may also be used to feed
into a KVM switch.
4. If you have an audio-enabled unit, connect the audio cables between the computer and
Local Unit as follows:
Computer Local Unit
Audio Out (green) Audio In
Audio In/Microphone (pink/blue) Audio Out
5. If you have a serial-enabled unit, connect the supplied serial cable between the serial
port on the computer and the Local Unit.
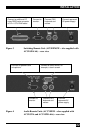
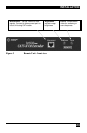
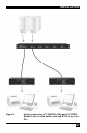
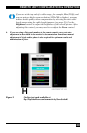
6. Connect the CATx cable to the INTERCONNECT socket on the front of the Local Unit
(see Figure 7).
7. Power up the PC.
The Local Unit normally takes power through the PCs keyboard port. In
video only applications, this connection is not used and an external PSU
is required.
Please contact Technical Support to obtain a suitable power supply.