


20
®
Flash upgrade
As part of the continual development and improvement process across our
range of products, software upgrades are occasionally made available. The
LOCAL and REMOTE modules both contain internal ash memory and our
unique keyboard-link upgrade technique allow you to utilise software upgrades
in a straightforward manner.
Note: It is important to upgrade both the LOCAL and REMOTE modules together
so that they are both running the same new version of software.
Note: To upgrade the REMOTE module, a special keyboard connection cable is
required. This cable must have 6pin mini-DIN male to 6pin mini-DIN male plugs
with all lines connected - this is a common cable used with KVM switches.
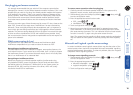
To perform a ash memory upgrade, you need to perform the following stages:
• Stage A – Download upgrade les from the website
• Stage B – Create a startup diskette and copy the les to it
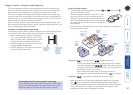
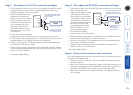
• Stage C – Recongure the LOCAL module connections and begin
• Stage D - Recongure the REMOTE module connections and begin
• Stage E - Return all connections to their usual states
Stage A - Download the upgrade les
To download the les
1 Contact Black Box technical support (see front cover) for details about how
to locate and download the appropriate upgrade le.
2 Decompress the downloaded le. Depending on the chosen option, there
will be a collection of suitable les. As a minimum, there should be the
following les:
• AUTOEXEC.BAT – directs the computer to run the upgrade programs.
• SSWExxx.EXE – this is the upgrade program that automatically
determines which module is connected and sends the appropriate
rmware le.
• SSWExxx.DAT – this le contains information about rmware versions
and is used by the SSWExxx.EXE to select the appropriate one.
• SSWExxxD.HEX – this is the rmware le for the LOCAL module.
• SSWExxxR.HEX – this is the rmware le for the REMOTE module.
Where xxx is the upgrade version number.
Now please follow Stage B.
Stage B - Create a startup diskette
For this stage you will need a 3 oppy diskette that is either blank or has
existing contents that are no longer required. The write protect tab must be
moved to the ‘unprotected’ position. Depending on your operating system, use
one of the following to create a startup disk:
To create a startup disk in Windows XP
1 Insert a diskette into the oppy disk drive.
2 Select ‘Start’ and then ‘My Computer’.
3 Right mouse click on the ‘3 Floppy (A:)’ icon and select ‘Format’.
4 Check the ‘Create an MS-DOS startup disk’ box and select ‘Start’.
To create a startup disk in Windows 95/98/Me
1 Insert a formatted diskette into the oppy disk drive.
2 Select ‘Start’, then ‘Settings’ and then ‘Control Panel’.
3 Double click on the ‘Add/Remove Programs’ icon.
4 Select the ‘Startup Disk’ tab.
5 Click ‘Create Disk’ and follow the instructions.
To create a startup disk in Windows 95/98 (alternative method)
1 Insert a diskette into the oppy disk drive.
2 Right mouse click on the ‘3 Floppy (A:)’ icon and select ‘Format’.
3 Select the ‘Full format’ option and ensure that the ‘Copy system les’ box is
checked.
4 Select ‘Start’ to format the disk.
To create a startup disk from MS-DOS or a DOS window within Windows
95/98
1 Insert a diskette into the oppy disk drive and check that the drive is
congured as drive A (it usually is).
2 At the DOS prompt (C:\>) type:
FORMAT A: /S
and follow the instructions given by DOS.
Copy the downloaded les to the disk
Once the diskette has been formatted, using Windows Explorer or the My
Computer option, copy the downloaded and decompressed les from your
computer to the oppy diskette.
Now please follow Stage C.