


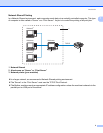


Configuring your machine for a network with an Ethernet cable connection
13
2
Changing the print server settings 2
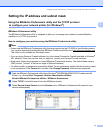
Using the BRAdmin Professional utility to change the print server settings
(for Windows
®
only) 2
a Start the BRAdmin Professional utility (from Windows
®
98/98SE/Me/2000/XP), by clicking Start /
Programs / Brother Administrator Utilities / Brother BRAdmin Professional Utilities /
BRAdmin Professional.
b Select TCP/IP in the left frame of the main BRAdmin window.
c Select the print server which you want to configure, in the right frame of the main BRAdmin window.
d Select Configure Print Server from the Control menu.
e Enter a password if you have set it.
Note
By default, no password is required to change the print server settings. You can set a password to change
the print server settings. Double click the device you want to set a password. Click Control tab, and then
click Change Password. Enter the new password.
f You can now change the print server settings.
Using the control panel to change the print server settings 2
You can configure and change the print server settings using the control panel LAN menu. See Control panel
setup on page 70.
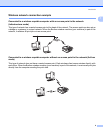
Using the Remote Setup to change the print server settings
(for Windows
®
and Mac OS
®
X 10.2.4 or greater)
(Not available for DCP models) 2
Remote Setup for Windows
®
2
The Remote Setup application allows you to configure network settings from a Windows
®
application. When
you access this application, the settings on your machine will be downloaded automatically to your PC and
displayed on your PC screen. If you change the settings, you can upload them directly to the machine.
a Click the Start button, All Programs, Brother, MFC-XXXX LAN, then Remote Setup (where XXXX is
your model name).
b Click TCP/IP (Wired) or Setup Misc.
c You can now change the print server settings.