


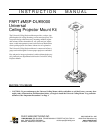

Instruction Manual MSP-DUK9000
5
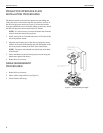
UNIVERSAL CEILING PROJECTOR MOUNT
INSTALLATION PROCEDURES
There are three common methods for installing the Universal Ceil-
ing Projector Mount Series ceiling mount. The Universal Ceiling
Projector Mount can be suspended from an adjustable column, stan-
dard fasteners secured to a wood framing member, or threaded rods.
WARNING: Improper installation can cause serious personal
injury! Make sure that the ceiling structural members can
support a redundant weight factor five times the total
weight of the equipment you intend to support overhead.
The ceiling must be reinforced before you install the Uni-
versal Ceiling Projector Mount if the ceiling cannot support
a redundant weight factor five times the total weight of the
equipment.
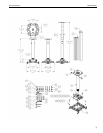
Adjustable Column
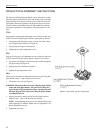
Installation using an adjustable column, or 1” diameter schedule 40
steel pipe section with 1” NPT threads, requires securing the adjust-
able column or pipe to the building structure. We suggest the use of
a backing block or Unistrut to secure the adjustable column or pipe
to a structural member (see Figure 2). Install the Universal Ceiling
Projector Mount on the adjustable column or pipe as follows:
1. Thread the Universal Ceiling Projector Mount onto the pipe a
minimum of 1/2” to allow for final yaw adjustment.
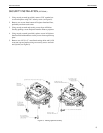
2. Using Allen wrench provided, tighten the set screw to lock the
Universal Ceiling Projector Mount in position (see Figure 3).
3. Proceed to “PROJECTOR INTERFACE PLATE ATTACH-
MENT PROCEDURES” on page 7.
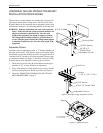
Figure 3. Tighten Set Screw
YAW ADJUSTMENT SCREW
(+/- 180 DEGREES)
Tighten
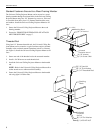
Figure 2. Examples Using Adjustable Column
(4) 3/8" x 3"
Grade 5 Bolt
(4) 3/8" Washer
(4) 3/8" Nut
Adjustable Column
Backing Block
Joist
Unistrut
(1 5/8" x 1 5/8", 12 GA.)
(4) 3/8" X 3" Grade 5 Bolt
(8) 3/8" Washer
(4) 3/8" Nut
Adjustable Column