


6
Instruction Manual MSP-DUK9000
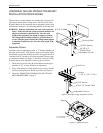
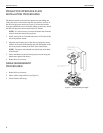
Standard Fasteners Secured to a Wood Framing Member
The Universal Ceiling Projector Mount can be secured to a wood
framing member through four slotted holes in the Universal Ceiling
Projector Mount using four 1/4” diameter lag screws or, if the area
is accessible from above, four 1/4” diameter machine bolts, nuts,
and washers. Install the Universal Ceiling Projector Mount as fol-
lows:
1. Secure the Universal Ceiling Projector Mount to the wood
framing member.
2. Proceed to “PROJECTOR INTERFACE PLATE ATTACH-
MENT PROCEDURES” on page 7.
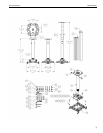
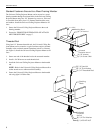
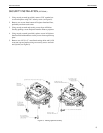
Threaded Rod
Using four 1/4” diameter threaded rods, the Universal Ceiling Pro-
jector Mount can be secured to a typical unistrut, angle or channel
assembly at the overhead structural members (trusses or I-beams)
(see Figure 4). Install the Universal Ceiling Projector Mount as fol-
lows:
1. Secure one end of the threaded rod to the structural member.
2. Install a 1/4-20 hex nut on each threaded rod.
3. Install the Universal Ceiling Projector Mount on the threaded
rod.
NOTE: Holes in the Universal Ceiling Projector Mount allow
socket wrench access without unit disassembly.
4. Secure the Universal Ceiling Projector Mount to the threaded
rod using eight 1/4-20 hex nuts.
Figure 4. 1/4”Threaded Rod
Joist
(8) 1/4" Hex Nut
(4) 1/4" Threaded Rod
Backing
Block
Universal
Projector
Mount
(8) 1/4" Flat Washer
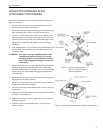
(8) 1/4-20 HEX NUT
(8) 1/4" Flat Washer
Joist
Backing Block
(4) 1/4" Hex Nut
(8) 1/4" Washer
(4) 1/4" Grade 5 Bolt
Universal
Projector Mount