


RSM Elite Series Projector Mounts Installation Instructions
6
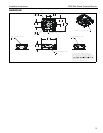
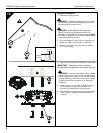
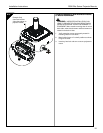
Rough Alignment of RSM
1. Turn RSM clockwise or counter-clockwise until
front of mount is facing target.
2. Secure RSM to pipe by turning set screw until tight.
CAUTION: DO NOT OVERTIGHTEN! Over
tightening of setscrew can damage threads on pipe.
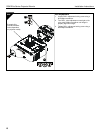
3. Turn security screw using a Phillips screwdriver
until set screw cannot be seen through access hole
in RSM.
1
(A)
3
2
4
(A)
2
1
3
1
(bottom view)
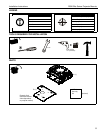
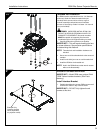
RSM INSTALLATION
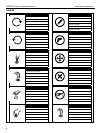
NOTE: Models RSM-A/RSM-B/RSM-C/RSM-D are
identical EXCEPT each provides a different
keyed lock.
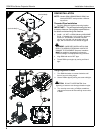
Threaded Pipe Installation
1. Carefully determine required mounting location.
IMPORTANT ! : This will require knowing the lens
to screen distance. See projector specifications
for details on determining this distance.
2. Install 1-1/2" NPT or NPSM following ANSI/ASME
B1.20.1 (Schedule 40, 0.154" minimum thickness
aluminum - ASTM B221) threaded extension
column (not included) into threaded collar until
tight, with a minimum of four threads engaged.
WARNING: IMPROPER INSTALLATION CAN
RESULT IN SERIOUS PERSONAL INJURY OR
DAMAGE TO EQUIPMENT! Structural members
MUST be capable of supporting five times the
combined weight of all equipment being mounted.
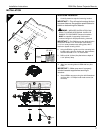
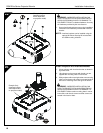
3. Align RSM with end of NPT pipe.
4. Thread RSM up onto pipe by turning until hand
tight.
(not included)
(not included)