


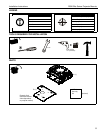


Installation Instructions RSM Elite Series Projector Mounts
9
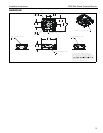
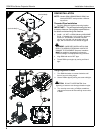
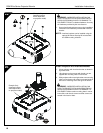
PROJECTOR INSTALLATION
IMPORTANT ! : Model RSM uses optional Chief
"SSM" Series interface brackets. (See Parts
drawing.)
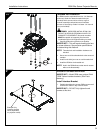
Install Interface Bracket
1. Partially thread thumb nuts onto Phillips screws until
screw end is visible in top of thumb screw.
IMPORTANT ! : DO NOT fully tighten thumb
screws at this time.
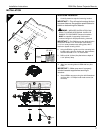
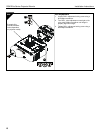
Threaded Rod Installation
The RSM must be suspended from four 1/4" diameter
(minimum) Grade 2 or better threaded rods (not
included) which are secured to unistrut, angle or
channel assembly overhead structural members
(trusses or I-beams) by Grade 2 or better 1/4" channel
nuts (not included).
WARNING: IMPROPER INSTALLATION CAN
RESULT IN SERIOUS PERSONAL INJURY OR
DAMAGE TO EQUIPMENT! Structural members
MUST be capable of supporting five times the
combined weight of all equipment being mounted.
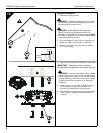
1. Carefully determine required mount position.
IMPORTANT ! : This will require knowing the lens
to screen distance. See projector specifications
for determining this distance.
NOTE: Threaded rod and installation hardware not
included.
2. Secure one end of the threaded rod to the structural
member.
3. Install four #10-24 jam nuts on each threaded rod.
4. Install the RSM on the threaded rod.
NOTE: Hole in the RSM allows socket wrench access
without unit disassembly.
(A)
2
1c
1 2
4
x 4
5
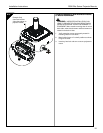
Example Only
(Interface bracket
varies dependent
on projector model)