


6
Cisco Security Device Manager (SDM) Quick Start Guide
78-16254-01
Use SDM to Configure the Router
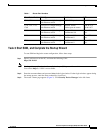
Step 1 Assign a new IP address to the PC’s Ethernet interface; place it on the same subnet as the router’s
Ethernet port, which you assigned in Step 7 of Task 3. See Figure 4 for an example configuration. If you
configured a DHCP server on the router, configure the PC to obtain an IP address automatically.
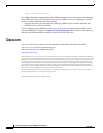
Figure 4 Configure the PC with an IP Address on the New Subnet
Figure 4 shows that you can connect the PC directly to the router using a crossover cable, or connect it
to a switch using a straight through cable.
Step 2 Open a web browser on the PC, and enter the SDM URL, using the new IP address that you gave the
LAN interface (https://new-IP-address). In the example shown in Figure 4, you would enter the
following:
https://172.16.30.1
The https://... specifies that the Secure Socket Layer (SSL) protocol be used for a secure connection.
You can use http://... if SSL is not available.
Step 3 Enter the username and password that you specified in Step 7 in the “Task 3: Start SDM, and Complete
the Startup Wizard” section on page 3.
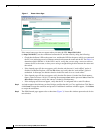
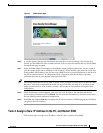
The SDM Overview window appears, as shown in Figure 5.
To continue configuring your router, see the “Using SDM” section on page 7.
Example static
or dynamic IP address:
172.16.30.2/255.255.255.248
Crossover cable
Example configured IP address:
172.16.30.1/255.255.255.248
172.16.30.0 subnet
Or
111012
Straight through cables