


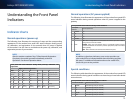

12
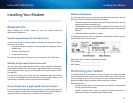
Installing Your Modem
Linksys DPC3008/EPC3008
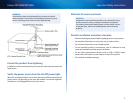
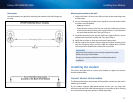
Dimensions
Use this illustration as a guide for mounting the modem to the wall. (Image not
to scale)
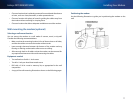
Mounting the modem to the wall
1.
Using a drill with a 3/16-inch bit, drill two holes at the same height and
4 inches apart.
2.
Are you mounting the modem into a drywall or concrete surface where
a wooden stud is available?
• If yes, go to Step 3.
• If no, drive the anchor bolts into the wall, and install the mounting
screws into the anchor bolts. Leave a gap of about 1/4 inch between
the screw head and the wall. Then, go to Step 4.
3.
Install the mounting screws into the wall. Leave a gap of about 1/4 inch
between the screw head and the wall. Then, go to Step 4.
4.
Verify that no cables or wires are connected to the modem.
5.
Lift the modem into position. Slip the large end of both mounting slots
over the mounting screws, and then slide the modem down until the
narrow end of the keyhole slot contacts the screw shaft.
IMPORTANT
Verify that the mounting screws securely support the modem
before you let go of the modem.
Contact your service provider for more information about
installation.
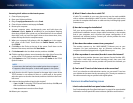
Installing the modem
This section describes how to connect your modem to support the services
that the modem offers.
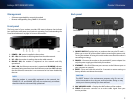
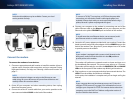
Connect devices to the modem
The following illustration shows many of the possible connections that can be
made to your modem.
If your modem supports high-speed Internet service, you can share that
Internet connection with other Internet devices in your home or office. Sharing
one connection among many devices is called networking.