


26
Cisco uBR10-LCP2-MC16C/MC16E/MC16S Cable Interface Card for the Cisco uBR10012 Router
OL-2872-02
Replacing the Line Card in the Cisco uBR10-LCP2 Adapter Card
Installing the Cisco uBR MC16x Cable Interface Line Card in the Adapter Card
Step 1 Ensure that you are properly grounded before handling the line card.
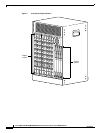
Step 2 Align the Cisco uBR10-MC16x cable interface line card with the guide rails on the Cisco uBR10-LCP2
adapter card. Ensure that the bottom of the cable interface line card is flush with the bottom of the LCP2
adapter card.
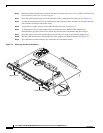
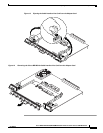
Step 3 Slide the new cable interface line card into the adapter card slowly, making sure that the card is sliding
under the spring guides and into the guides (see Figure 3 on page 7).
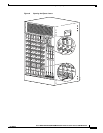
Step 4 Continue pushing on the front of the card until the connectors on the card are firmly seated in the
connectors on the adapter card. The ejector levers on each side of the card snap into place when the card
is fully inserted.
Step 5 Verify that the power connectors are aligned with those on the adapter card.
Step 6 Continue pushing on the front of the card until the connectors on the card are firmly seated in the
connectors on the adapter card. The ejector levers on each side of the card snap into place when the card
is fully inserted.
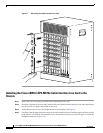
Step 7 Make sure that the screws on the adapter card brackets slide cleanly into the holes in the L-brackets.
Note These brackets help align the Cisco uBR10-LCP2 adapter card and Cisco uBR-MC16x cable interface
line card and hold the cable interface line card and the adapter card together.
Step 8 Tighten the captive screws on the cable interface line card to secure it to the LCP2 adapter card. See
Figure 12 on page 24.
Step 9 Replace the retaining washers and retaining nuts on the L-brackets (see Figure 13 on page 25). Make
sure that they are finger-tight.
Step 10 To secure the adapter card to the cable interface line card, turn the nuts a half-turn with the wrench.
Replacing the Cisco uBR10-LCP2-MC16x Cable Interface Line Card in the
Chassis
Tip It is not necessary to configure the cable interface line card if you are installing a replacement card in
the identical slot. The system automatically downloads the necessary configuration information from the
PRE.
Step 1 Ensure that you are properly grounded before handling the line card.
Step 2 Grasp the faceplate of the new cable interface line card with one hand and place your other hand under
the card carrier (to support the weight of the card) and position the card in front of the card cage slot.
Step 3 Carefully align the upper and lower edges of the cable interface line card with the upper and lower guides
in the chassis, and slide the card into the slot until you can feel it begin to seat in the backplane
connectors (Figure 10 on page 21).