


Add Printer as a Replacement for Legacy Printer
Note: Default setting for Ser/Com is 9600 baud, 8 bit word length, no parity, 1 stop bit. Default setting for network
communications (Ethernet) is DHCP ON.
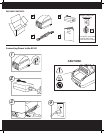
1. Print conguration label or record your current printer’s settings, including the driver port setting
2. Power o your current desktop label printer and disconnect the communication cable
3. Connect Power supply to EZ-LP and plug into wall. Do NOT turn on EZ-LP at this time
4. Connect preferred interface cable to EZ-LP and connect to PC
5. Turn on the EZ-LP printer
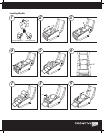
6. If using USB connection a New Hardware Wizard may appear on screen. Click on “Cancel”; continue with the
next step 9 below. If using Ser/Com, Parallel or Ethernet connection continue with the next step below
7. Print from your application, you are nished. If you need to make adjustments see the beginning of this
section, Printer Installation, for your options
8. If you wish to add the EZ-LP and assign it to an existing driver, please continue.
9. In Microsoft Windows click START > Printers and Faxes > Add printer and follow the Add Printer Wizard
10. In the Welcome to the Add Printer Wizard window, click “Next”
11. In the Local or Network Printer window, choose “Local printer attached to this computer” and click “Next”
12. In the Select a Printer Port window, click on the drop down arrow to select your port and click “Next”
13. Next you will see the Install Printer Software window, this step assigns a particular printer driver to the printer.
The EZ-LP can use ZPL and EPL printer drivers for printing. Scroll down to choose the manufacturer of the
printer you are replacing then choose its model number in the “Printers” box, click “Next”
14. In the Use Existing Drivers window, choose “Keep existing driver (recommended)” and click “Next”
15. In the Name Your Printer window, type “EZ-LP” or the designation of your choice in the “Printer name:” eld,
click “Next”
16. In the Printer Sharing window, choose the option you desire “Do not share this printer” is the default, click
“Next”
17. In the Print Test Page window, leave on “Yes” if desired, note that the test page will not print until the Add
Printer Wizard is nished, click “Next”
18. In the Completing the Add Printer Wizard window, click “Finish”
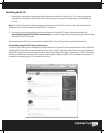
USB Plug and Play Note: if you did not install CognitiveTPG Printer Administrator and CognitiveTPG drivers you will see
a pop-up Add Hardware Wizard window on your PC every time power is cycled on the printer or the PC. You may click
on “cancel” and continue working or you may follow the Downloading CognitiveTPG Printer Administrator instructions
above to prevent this pop-up from occurring. You may continue to print using the original EPL or ZPL printer driver.