


12
T
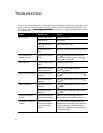
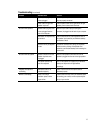
ROUBLESHOOTING
You may save time and money by solving common monitor problems using the following simple, easy-
to-apply solutions. If you are unable to solve the problem using these troubleshooting solutions, visit
the Compaq website at
www.compaq.com/athome
www.compaq.com/athomewww.compaq.com/athome
www.compaq.com/athome
or contact your Compaq authorized dealer, reseller,
or service provider.
Problem Possible Cause Solution
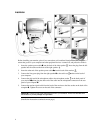
Screen is blank Power cord disconnected Connect the power cord
Power switch off Turn on power
Signal cable improperly
connected
Connect signal cable properly
Screen blanking utility is
active
Depress any key on the keyboard or move the mouse
Image appears blurred,
indistinct, or too dark
Brightness and contrast are
too low
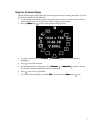
Press to access the On-Screen Display (OSD),
then select the brightness and/or contrast
icon to adjust to desired levels*
Color is abnormal A magnetic object may be
nearby
Move the object farther away
Monitor has been moved or
inadvertently bumped
Press to access the OSD, then select
Degauss to activate*
Image is too large or too small Horizontal width may need
adjustment
Press to access the OSD, then select H. Size
to adjust*
Vertical height may need
adjustment
Press to access the OSD, then select V. Size
to adjust*
Image is not centered Horizontal position needs
adjustment
Press to access the OSD, then select H. Position
to adjust*
Vertical position needs
adjustment
Press to access the OSD, then select V. Position
to adjust*
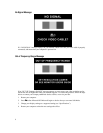
“No Signal” is displayed
on screen
Monitor signal cable is not
connected to the computer
Connect the 15-pin monitor signal cable to the
computer. Be sure that the computer power is on.
“Out of Range” is displayed
on screen
Video resolution and/or
refresh rate are set higher
than what your monitor
supports
Restart your computer, press
F6
before Microsoft
Windows begins to load so that you enter Safe Mode.
Change your settings to a supported setting (see
“Specifications”). Restart your computer so that the
new settings take effect.
*Refer to the “Using Your On-Screen Display” section for detailed instructions. (
continued
)