


46 E-4203/E-4204/E-4304
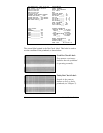
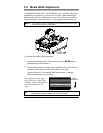
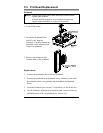
5.5 Printhead Replacement
Removal:
; Notes: Always follow proper Electro Static Discharge procedures when
replacing the printhead.
If thermal transfer equipped, it is not necessary to remove the
Ribbon Handler Assembly; an access hole is provided.
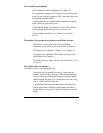
1. Turn off the printer.
2. Loosen the Printhead Screw
until it is free from the
printhead. Carefully unlatch the
printhead carrier assembly and
remove the printhead.
3. Remove the printhead cable
from the back of the printhead.
Replacement:
1. Connect the printhead cable to the new printhead.
2. Position the printhead in the printhead carrier assembly, ensure that
the printhead cable is not pinched, and then tighten the Printhead
Screw.
3. Clean the Printhead (see Section 5.1) and allow it to dry before use.
4. Use the Darkness Adjustment to match the print contrast of the new
printhead to that of the old printhead (see Section 5.6).