


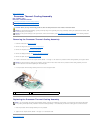


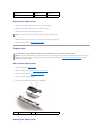


12. Lift the display up and away from the computer.
Replacing the Display Assembly
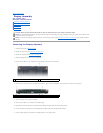
1. Place the display onto the computer base.
2. Replace the two M2.5 x 5-mm screws in the display hinge.
3. Securely route the display cable under the tabs in the cable channel.
4. Connect the display cable to the system board and tighten the captive screw.
5. Securely route the antenna cables under the tabs in the antenna cable channel. If a Mini-Card is installed, connect the antenna cables to the card (see
Replacing a Mini-Card).
6. Replace the keyboard (see Replacing the Keyboard).
7. Replace the hinge cover (see Replacing the Hinge Cover).
8. Close the display.
9. Replace the two M2.5 x 8-mm screws in the back of the computer and replace the two screw covers.
10. Turn the computer over and replace the two M2.5 x 8-mm screws in the bottom of the computer.
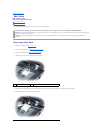
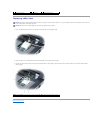
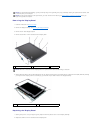
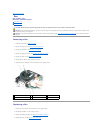
Display Bezel
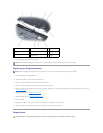
1
M2.5 x 5-mm screws (2)
2
display cable
3
display cable pull-
tab
4
grounding-wire and captive
screw
5
antenna cables (2)
6
antenna cable
channel
7
standby switch
8
display cable connector on
system board
9
display cable
channel
NOTICE: The standby switch is fragile and easily broken. Avoid knocking the switch when removing and replacing the display.
NOTE: Ensure the display and antenna cables are not twisted and are clear of the computer base before replacing the display.
CAUTION: Before you begin the following procedure, follow the safety instructions in the Product Information Guide.