


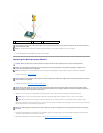

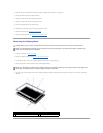


5. Lift the cable securing tab and gently pull to disconnect the camera module cable from the connector.
6. Gently lift the bottom of the display panel up, then slide the display panel forward to remove it from the display cover.
7. Remove the six M2 x 3-mm screws (three on each side) securing the display bracket to the display panel.
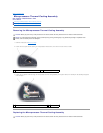
8. Press inward on the metal clamps on both sides of the top flex-cable connector and gently pull to disconnect the top flex-cable connector from the
display locking connector.
9. Use the pull-tab to disconnect the bottom flex-cable connector from the inverter connector.
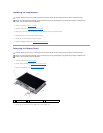
Replacing the Display Panel
1. Follow the instructions in Before Working Inside Your Computer.
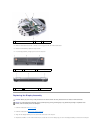
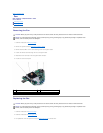
1
display panel
2
display cover
3
camera module connector
4
camera
5
camera module
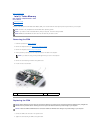
1
back of display panel
2
top flex-cable connector
3
camera module cable
4
metal clamp
5
bottom flex-cable connector
6
inverter connector
CAUTION: Before you perform any of the procedures in this section, follow the safety instructions in the Product Information Guide.
NOTICE: To avoid electrostatic discharge, ground yourself by using a wrist grounding strap or by periodically touching an unpainted metal
surface, such as the back panel on the computer.