


Removing and Replacing Parts 4-19
S
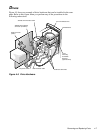
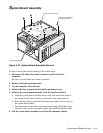
ystem Board Assembly
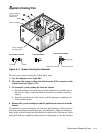
Figure 4-18. System Board Assembly Removal
To remove the system board assembly, follow these steps:
1. Disconnect all cables from their connectors at the back of the
computer.
Be sure to record where each cable is attached.
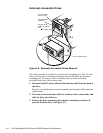
2. Remove all of the expansion cards.
3. Lay the computer on its left side.
4. Remove the four system-board-assembly mounting screws.
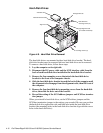
5. Remove the system board assembly from the chassis as follows:
a. Slide the system board assembly about a half-inch toward the front of
the system (to free the connectors at the back of the system board).
b. Raise the top of the system board assembly up enough to allow access to
the system board cables.
c. Disconnect the power cables, the control panel cable, the diskette drive
interface cable, system cooling-fan cable, and the SCSI interface cable.
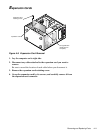
6. Lift the system board assembly away from the computer chassis.
system-board-assembly
mounting screws (4)
system board assembly
system board cables