


7-10 Installation and Troubleshooting Guide
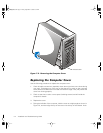
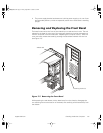
To replace the bezel, fit the two retaining hooks on the bezel into their corresponding
slots at the bottom of the chassis. Then rotate the top of the bezel toward the chassis
until the top tabs snap into their corresponding slots on the bezel.
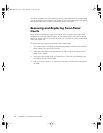
Removing and Replacing Front-Panel
Inserts
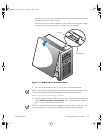
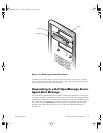
Empty 5.25-inch drive bays contain a front-panel insert to protect the inside of the
computer from dust particles and also to ensure proper airflow within the computer.
Before you install a drive in an empty drive bay, you must first remove the front-panel
insert (see Figure 7-8).
To remove the insert covering a drive bay,
follow these steps:
1. Turn off the system, including any attached peripherals, and disconnect all the AC
power cables from their power sources.
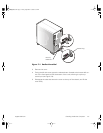
2. Remove the computer cover as instructed in “Removing the Computer Cover,”
earlier in this chapter.
3. Remove the front bezel using the instructions in “Removing and Replacing the
Front Bezel,”earlier in this chapter.
4. With your thumbs, press in on each end of the insert until the insert snaps free of
the bezel.
905grbk0.book Page10 Friday,September 1, 2000 9:30AM