


Back to Contents Page
Display Assembly
Dell™Vostro™320ServiceManual
Removing the Display Panel
NOTE: You may need to install Adobe®Flash®Player from Adobe.com to view the following illustrations.
1. Follow the procedures in Before Working Inside Your Computer.
2. Remove the front panel.
3. Remove the internal panel.
4. Remove the I/O cover.
5. Remove the hinged stand.
6. Remove the optical drive.
7. Remove the back cover.
8. Remove the back metal-shielding.
9. Remove the system-board shielding.
10. Remove the wireless local area network (WLAN) card.
11. Remove the memory module.
12. Remove the heat sink.
13. Remove the processor.
14. Remove the system board.
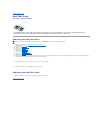
15. Remove the screws that secure the display panel to the computer chassis.
16. Carefully remove the display panel from the computer. Ensure that you do not damage the cables while removing the display panel from the computer
chassis.
Replacing the Display Panel
To replace the display panel, perform the above steps in reverse order.
Removing the Display Cable
1. Follow the procedures in Before Working Inside Your Computer.
2. Remove the display panel.
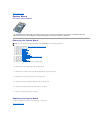
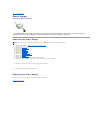
3. Release the tape that secures the display cable to the display-panel connector.
4. Press the securing clips on either side of the display-panel connector, and then pull the cable straight out to remove the cable.
Replacing the Display Cable
To replace the display cable, perform the above steps in reverse order.
Back to Contents Page
WARNING: Before working inside your computer, read the safety information that shipped with your computer. For additional safety best
practices information, see the Regulatory Compliance Homepage at www.dell.com/regulatory_compliance.
Removing the Display Panel
Replacing the Display Panel
Removing the Display Cable
Replacing the Display Cable