


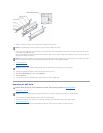
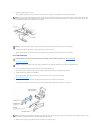
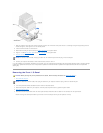


7. Raise the retention lever and press until the heat sink is secured. You will feel the lever pause once it is at a 90-degree angle. Keep pressing the lever
another 30 degrees, ensuring that it is in the locked position
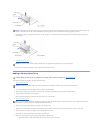
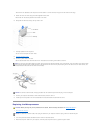
8. Lower the airflow shroud over the heat sink.
9. Reconnect the cooling fan power cable to the CR3F1 connector on the system board.
10. Plug the +12-VDC P2 DC power cable into the J4B1 connector on the system board.
11. Close the computer cover.
12. Connect your computer and devices to their electrical outlets, and turn them on.
If you are installing a microprocessor replacement kit from Dell, return the original heat sink assembly and microprocessor package to Dell in the same package
in which your replacement kit was sent. Your microprocessor replacement kit should include a replacement microprocessor heat sink and one replacement
securing clip.
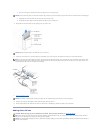
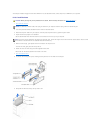
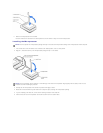
Removing the Front I/O Panel
1. Shut down the computer.
2. Turn off any attached devices and disconnect them from their electrical outlets.
3. Disconnect the power cable from your computer, and then press the power button to ground the system board.
4. Open the computer cover.
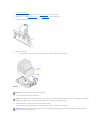
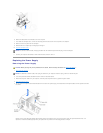
5. Disconnect the control panel cable from the control panel connector. Disconnect the I/O cable from the connector on the system board.
Note the routing of the control panel cable as you remove it from the computer so that you can replace it correctly.
NOTICE: To connect a network cable, first plug the cable into the network wall jack and then plug it into the computer.
CAUTION: Before you begin any of the procedures in this section, follow the safety instructions in "Safety Instructions."
NOTICE: To disconnect a network cable, first unplug the cable from your computer and then unplug it from the network wall jack.