


Type 2
a. Loosen the four captive screws that secure the processor fan and heat sink assembly to the system board.
b. Lift the processor fan and heat sink assembly out of the computer.
Replacing the Processor Fan and Heat Sink Assembly
1. Follow the procedures in Before You Begin.
2. Clean the thermal grease from the bottom of the processor fan and heat sink assembly.
3. Apply the new thermal grease to the top of the processor.
4. Replace the processor fan and heat sink assembly:
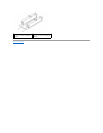
Type 1
a. If required, rotate the fasteners on the processor fan and heat sink assembly clockwise to ensure that they are in the lock position.
b. Align and press the four fasteners on the processor fan and heat sink assembly into the screw holes on the system board.
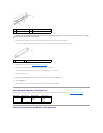
Type 2
a. Align the four captive screws on the processor fan and heat sink assembly with the screw holes on the system board.
b. Tighten the four captive screws that secure the processor fan and heat sink assembly to the system board.
5. Connect the processor fan cable to the system board connector (see System Board Components).
6. Replace the computer cover (see Replacing the Computer Cover).
7. Connect your computer and devices to electrical outlets, and turn them on.
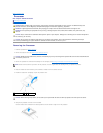
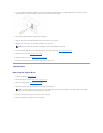
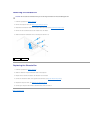
1
processor fan cable
2
fastener grooves (4)
3
fasteners (4)
4
processor fan and heat sink assembly
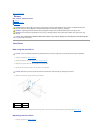
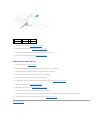
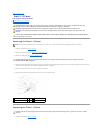
1
processor fan cable
2
captive screws (4)
3
processor fan and heat sink assembly
CAUTION: When reinstalling the fan, ensure that you do not pinch the wires that run between the system board and the fan.
CAUTION: Ensure that you apply new thermal grease. New thermal grease is critical for ensuring adequate thermal bonding, which is a
requirement for optimal processor operation.
NOTE: Ensure that the processor fan and heat sink assembly is correctly seated and secure.