


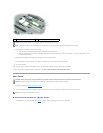
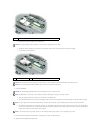


a. Disconnect the antenna cables from the WLAN card.
b. Release the card by pushing the metal securing clips toward the back of the computer until the card pops up slightly.
c. Lift the card out of its connector.
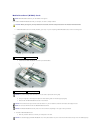
2. Install the WLAN card:
a. Move any antenna cables out of the way to make space for the WLAN card.
b. Align the WLAN card with the connector at a 45-degree angle, and press the card down into the securing clips until the card clicks into place.
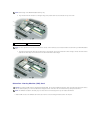
c. Connect the antenna cables to the antenna connectors on the WLAN card by matching the color of the cable to the color of the triangle above
the connector. Connect the main antenna cable (white) to the antenna connector with the white triangle. Connect the auxiliary antenna cable
(black) to the antenna connector with the black triangle.
3. Connect the antenna cables to the WLAN card, ensuring that you route the cables correctly.
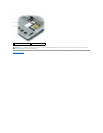
4. Replace the memory/Mini-Card module cover.
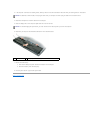
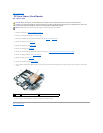
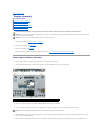
1
antenna cables (2)
NOTICE: To prevent damage to the connector, do not use tools to spread the securing clips.
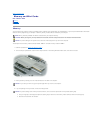
1
WLAN card
2
metal securing clips (2)
NOTICE: The connectors are keyed to ensure correct insertion. If you feel resistance, check the connectors and realign the card.
NOTE: Do not insert a Mobile Broadband (WWAN) network card into the WLAN card connector.
NOTICE: To avoid damaging the WLAN card, never place cables on top of or under the card.
NOTE: The WLAN card may have two or three antenna connectors, depending on the type of card you ordered.
NOTE: For more specific information about which cable to connect to which connector, see the documentation that came with your WLAN card.
NOTE: If your computer has a gray cable, connect it to the connector with the gray triangle, if one is available on your card.